Spray Skirts for Kayaks – A Look at Features, Fabrics and Functionality

Over the last 10 years, the standard wardrobe and gear needs of most kayakers have shifted from functional, basic essentials to high-tech, often flashy items created from space-age fabrics and composite materials.

In the midst of all this glamour, the humble spray skirt, for the most part, has changed little. Its basic design, constructed of neoprene or some variation of coated nylon, has remained fairly consistent throughout the last decade. Times, however, are changing.

The spray skirt’s day in the limelight has finally arrived. Though their primary purpose remains the same, many of today’s spray skirts exhibit a trend toward new fabrics, special features and increased functionality. The products in this review provide good examples of that trend.

Put to the Test

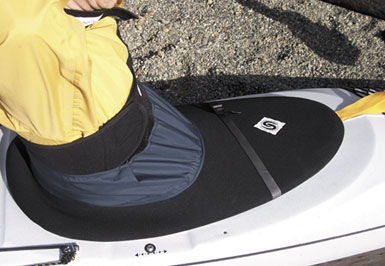
In testing the following six spray skirts, I wanted to examine how well they performed their primary purpose—keeping water out of the cockpit. The fit and seal of a spray skirt around the cockpit coaming is a critical safety aspect for kayakers. It is essential that the spray skirt is the right size for the kayak it will be used on.

There is no substitution for trying a skirt on the kayak you intend to use to ensure proper fit. Also of importance is how challenging it is to get the skirt attached to and released from the coaming.

You want the spray skirt to seal well enough to keep the water out but be easy to release with one hand. If the seal around the coaming is too tight, the skirt may not release easily during a wet exit; if it’s too loose, the paddler will have a cockpit full of water in no time, adversely affecting the kayak’s stability.

Another important aspect of a secure spray skirt pertains to the seal around the paddler’s waist, known as the tunnel. A number of factors can impact this seal, including the type of fabric, the type of closure or tightening system and, of course, the shape and size of the paddler.

In addition to testing the primary functions of these spray skirts, I wanted to see how well the various features performed, such as pockets, secondary release systems and other extras, and how well the features met the claims made by the manufacturers.

The spray skirts reviewed here were tested on both a fiberglass kayak and a plastic kayak.

Bomber GearTour de Jour

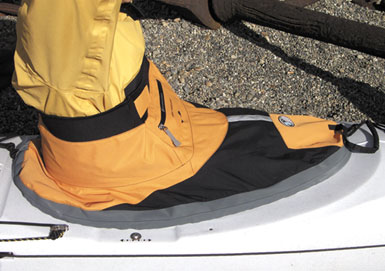
Bomber Gear’s Tour de Jour is made from a waterproof, breathable three-ply fabric. The spray deck is sewn to a rand (a sleeve of fabric sewn to the perimeter of the spray deck) made from a sticky rubber fabric.

All seams except where the rand and spray deck meet are sewn and made waterproof with heat-sealed tape.

A length of elastic cord is routed through the sleeve and knotted at the back of the skirt. Although the elastic cord allowed the tension of the spray deck to be adjusted, the knot interfered with getting the skirt over both the fiberglass and plastic kayaks’ coaming.

It was only slightly difficult to attach it to the fiberglass coaming but notably difficult to get it started on the plastic coaming.

At the top of the tunnel, a three-inch-wide band of smooth neoprene is attached around the perimeter. This provides a sticky seal that is complemented by two hook-and-loop cinch tabs that pull forward to tighten the seal. The system worked well and stayed put once it was in place.

The Tour de Jour has a strip of plastic inserted in a fabric sleeve that is flexed by a strip under the deck into an arch to prevent water from pooling on the deck. The system worked very well—water quickly ran off the spray deck.

A band of reflective tape on the spray deck provides enhanced nighttime visibility. On the front of the tunnel, there is a zippered self-draining outer pocket. Inside, there is another pocket, just big enough for a small wallet, which has a roll-down dry-bag-type closure. I found the dry pocket to be too small to be convenient while afloat, but it does provide a place for ID, a bit of cash and car keys.

Brooks Wetsuits Zippered Neoprene Touring Spray Skirt

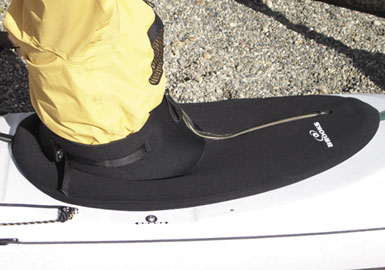
For those who don’t want to bother with wrestling the spray skirt on and off the coaming every time they want to reach inside the cockpit, Brooks Wetsuits offers the Zippered Neoprene Touring Spray Skirt.

Featuring a 3.5mm neoprene spray deck that is heavily reinforced with Duratex fabric over the entire deck, this skirt feels durable. The tunnel features stretch nylon inside and out that offers an extra layer of warmth.

The perimeter of the spray deck is folded over and sewn, creating a sleeve for an elastic cord. This seals around the kayak coaming and is adjustable via a knot in the back. Brooks has added a short plastic spacer that holds the knot away from the coaming edge so it doesn’t interfere with attaching the skirt at the back of the coaming.

The Zippered Touring Skirt could be stretched over a fiberglass coaming with moderate ease but with moderate difficulty on the more slippery plastic coaming. Once in place, the spray skirt was secure on both.

Two adjustable waist straps, one sewn onto each side of the skirt tunnel, ensure that the Zippered Neoprene Touring Spray Skirt stays secure and snug around the paddler’s waist. The system worked well and provided a good seal around my waist, but I found reaching back to the straps and buckles a bit awkward.

Though this skirt does not have any pockets, its zipper feature allowed easy access to the inside of the cockpit without removing the spray skirt from around the coaming.

A heavy-duty, waterproof zipper, the same kind as are used in dry suits, runs from the top of the tunnel down the front of the spray deck and stops a few inches short of the grab loop.

The zipper ends at the top of the tunnel, so unzipping the skirt usually requires opening a life jacket and lifting any apparel that may be covering the tunnel of the skirt. Although the zipper allowed easy access to the inside of my cockpit, I found that it was just as easy to pull the front of the spray skirt off if I wanted cockpit access.

Where the zipper did provide a significant benefit was getting in and out of the spray skirt.

A neoprene spray skirt with a snug tunnel can be a struggle to pull on over a wetsuit, especially for those with wider hips and a narrow waist. The zipper made it a breeze.

I just unzipped, pulled the skirt up around my waist and zipped it up. As with most dry suit zippers, this one needs to be kept clean and lubricated to operate smoothly (Brooks supplies a stick of zipper lubricant with the skirt). Without it, the zipper can get very stiff and difficult to use.

Kokatat Water Sportswear Offshore Deluxe Sea Skirt

Kokatat’s Offshore Deluxe Sea Skirt has a deck of 3mm neoprene, reinforced for durability with a rubber coating on the inside and on the outside along the forward edges of the coaming. Attached to the deck is a 4-oz. coated-nylon tunnel.

All seams, nylon and neoprene, are sealed on the inside. The seal around the coaming is secured with bungee cord externally stitched around the perimeter of the spray skirt.

Getting this spray skirt attached to a fiberglass coaming is moderately easy, requiring that you make sure the back of the skirt strap is anchored while you pull the spray deck forward. Getting it started on a plastic coaming was much more difficult because the back of the spray deck doesn’t have enough contour to hook around the plastic coaming and stay in place. Once fully attached on either coaming, the spray skirt had a secure fit yet released with relative ease.

The seal around the waist is achieved through a wide band of smooth-skin neoprene along the top edge of the nylon tunnel. Smooth-skin neoprene has an especially sticky characteristic that helps prevent the tunnel from slipping down.

The neoprene band is tightened around the torso by a pair of tabs with wide hook-and-loop patches. Cinching each tab back along the side of the skirt tunnel snugs the tunnel into place. Once I had it in place, the tunnel did not slip down around my waist, although tightening it would have been easier if the tabs were attached so that they pulled from back to front instead of front to back.

The tunnel is further supported by adjustable suspenders with stretch webbing. The suspenders are removable for wearing the spray skirt layered under paddle tops or dry suits with overskirts.

Kokatat has included a self-draining, zippered pocket at the front of the tunnel. The pocket is ample in size for a pair of gloves or a set of flares and a couple of energy bars. It has a zipper pull that was big enough for me to grasp while wearing gloves. Behind the cargo pocket is a fleece-lined hand-warming pouch.

Along the center of the spray deck, Kokatat has sewn a length of one-inch nylon webbing, which has two unsewn spans that provide places to clip gear, such as a GPS on a lanyard.

I found this feature quite useful, as I often like to secure gear right in front of me—not up on the foredeck of the kayak.

A second piece of webbing with strips of hook and loop sewn on it provides a way to secure a paddle or other gear quickly, if temporarily. Kokatat offers this spray skirt in the nylon/neoprene configuration reviewed here.

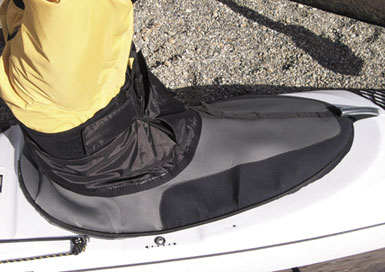
Mountain Surf Neo / Aqualogic Lindberdeck

The spray deck of the Mountain Surf spray skirt is made from durable 4mm neoprene laminated between two layers of nylon stretch fabric.

The deck is sewn and taped to a tunnel made of Aqualogic, a tough, breathable, waterproof fabric. The skirt looks both functional and durable.

At the edge of the spray deck, the rand is formed by a separate strip of neoprene attached around the perimeter of the spray deck. Inside the edge of neoprene is a strong O-ring of solid rubber, unlike the multi-filament bungee cords commonly used on other spray skirts, that provides the tension on the seal of the coaming.

Mountain Surf provides the O-rings in two different degrees of tension: E-Z fit or, for more extreme conditions, the Bomber Fit. The E-Z fit model tested was easy to attach and remove, and it fit and held exceptionally well around the coaming.

At the top of the tunnel, a two-inch-wide band of smooth neoprene is folded over and sewn around the top perimeter, creating a sleeve for the skirt’s quick-release chest belt. I found the system easy to use, and although it slipped down around my waist a little while paddling, it tended to stay in place.

A handy mesh pocket, large enough for a few pocket flares or energy bars, is attached to the front of the tunnel. Its zipper has a pull that can easily be grasped with wet or gloved hands.

Prijon / Wildwasser Pocket-System Neo/Neo

Prijon/Wildwasser offers the versatile Pocket-System Neo/Neo touring spray skirt. Simple in design, the forward edge of the spray deck is neoprene, faced with an abrasion- and UV-resistant Supratex weave designed to resist the wear caused by a paddle rubbing against the coaming.

The transition from the spray deck to the tunnel creates a tent-shaped sloping surface that sheds water easily. This is different from most spray skirts, where the nearly vertical tunnel is a tube sewn onto a flat spray deck.

An elastic cord is sewn to the outside perimeter of the spray deck, but it doesn’t curl the edge of the spray deck enough to hook around the cockpit coaming and anchor the back of the spray skirt while you stretch it forward. The comparatively flat perimeter of this spray deck made it somewhat difficult for me to attach it on the fiberglass coaming, and I needed help to install it on the plastic coaming.

Like some whitewater spray skirts, the Pocket-System Neo/Neo doesn’t have a belt of hook-and-loop tabs to adjust the fit around the paddler’s torso. Instead, the neoprene stretches to fit a girth from 30 to about 40 inches.

(Keep in mind that it gets tighter the farther it stretches.) For me, the stretch fit worked well on the water, creating a good seal around the waist and adding another layer for warmth.

The pocket feature of the Pocket-System Neo/Neo is a large mesh pocket sewn onto the forward portion of the spray deck. Unlike accessing a pocket sewn into the spray-skirt tunnel, which may require unzipping your life jacket, this pocket is easily accessible through a large zippered opening that faces toward the tunnel and is big enough to hold full-sized binoculars or a double-handful of miscellaneous items. This spray skirt is also available with a breathable fabric tunnel and suspenders for additional cost.

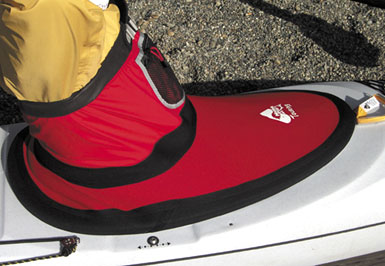
Snap Dragon Glacier Trek EZ

Snap Dragon introduced the Glacier Trek EZ as a new skirt for 2003. The spray deck on this skirt is a heavy-duty, 3.5mm, four-way-stretch neoprene. Attached to the deck is a tunnel made of breathable, waterproof Sympatex fabric, providing a cooler core area than a neoprene tunnel without the moisture-trapping properties of coated nylon.

Snap Dragon has perfected the shape of the seal around the coaming. On this spray skirt, the bungee is sewn to the edge of the spray deck. The neoprene deck is gathered as it is sewn, creating a slight curl that makes this skirt considerably easier to install over the coaming.

It was very easy to install over the fiberglass coaming but, like most spray skirts, was a bit slippery getting started on the coaming of the plastic kayak. Once in place, this spray skirt fit both cockpits exceptionally well.

Around the waist area of the skirt, the top of the Sympatex tunnel is rimmed with a four-inch band of neoprene. Hook-and-loop fabric tabs are used to cinch the tunnel around the waist of the paddler.

The tabs of hook fabric are at the side of the tunnel and pull forward to secure on the loop fabric sewn on the front of the tunnel. The system was simple to use, and it kept the skirt securely in place around my waist.

The Glacier Trek EZ lacks elaborate features, but it does have a great safety feature—the Knee-Off safety strap. A single length of flat webbing extends across the top of the spray deck and fastens to the rand at each side of the spray deck.

If the standard grab loop fails or gets inadvertently tucked under the forward edge of the spray skirt, pulling the Knee-Off safety strap releases the spray deck at the sides of the coaming. Its name, it should be pointed out, refers to its location above the knee, while the principal way of using it is to pull it by hand.

On some plastic kayaks, that may be enough to completely release the spray skirt. On the fiberglass kayak used for testing, the skirt did not come completely free of the coaming, but it pulled the edge of the skirt to the point where it was easy to grab and remove. The Knee-Off strap is an optional feature that adds about $8 to the retail price.

Best Foot Forward – A Review of Eight new Kayaking Shoes

You know those stories where sea kayakers describe landing spots using phrases like “waves sweeping smoothly up a gently sloping white sand beach”? That never happens to me.

My paddling trips always seem to skirt gnarly coasts where the rubble on the beach is still several geologic epochs short of “sand.” Perhaps that’s because my main stomping grounds are in the Sea of Cortéz—a toddler, as coasts go. With Baja California still in the process of being ripped asunder from the Mexican mainland, the shore here is rarely described as “smooth” or “gentle.”

If there is any sand, it’s usually just a tenuous strip between water and the barely cooled volcanic substrate under the desert scrub.

For this reason, I’ve always steered away from sandals and wetsuit booties toward more substantial paddling footwear. I want something that will protect my feet during a landing but also while scouting camp sites and just looking around spontaneously.

For years, I’ve worn a pair of U.K.-made Hunter Wellington boots during winter (to the delight of several groups of English paddling clients who believed that I might have the only Wellies in the world with cactus-spine scars).

During the hot months, I used to switch to cheap, high-top Keds, which worked great in terms of traction and abrasion protection above the anklebones, but not so great in that they held water and tended to rot quickly. Then someone invented water shoes, and my life got much easier.

Designed to Get Wet

Broadly speaking, a water shoe is simply a shoe designed to get wet. Most are constructed of neoprene or nylon mesh with synthetic leather reinforcement. With these materials, neoprene is warmer, but nylon dries more quickly.

Soles can range from stippled rubber to fairly stout lugs, and uppers can be low or high cut. (Stout lugs offer better protection on rough surfaces and more support for walking but are clunkier in the boat. High uppers are warmer and protect your ankle bones.)

Some water shoes simply pull on, and others lace up and look from a distance like typical athletic shoes.

Rugged coasts aren’t the only reason to consider wearing water shoes. They are designed to hold up to the chafing of your heels or the sides of your feet against the hull of the kayak.

In my opinion, they offer firmer control of rudder pedals than any sandal. Some models offer fair protection against immersion hypothermia, whether worn alone or, even better, over a light pair of insulating booties.

Virtually all are surefooted while you’re clambering over a wide variety of shoreline terrain, from Pacific Northwest logjams to Baja volcanoes.

TechAmphibian $85

The Salomons might be the best hot-weather kayaking shoes I’ve used. The entire upper is constructed of nylon mesh just tight enough to keep out sand grains that would be large enough to chafe, with synthetic leather reinforcements.

The result is an airy shoe that never feels stuffy and empties itself of water instantly. The heel strap makes it easy to adjust the fit of the shoe to wear over neoprene booties, making the TechAmphibians viable as a cold-water choice too.

The sole is broad, shallow-lugged and quite stiff, very similar to that on a standard light hiking shoe. It has an expanded vinyl acetate (EVA) midsole for shock absorption and a thermoplastic footplate for protection and rigidity. As a result, it offered the best performance in the group of shoes reviewed, for scrambling over coquina reefs, sharp-edged rocks and other desert terrain.
The uppers, however, are susceptible to thorns and aren’t high enough to protect your ankle bones from scrapes.

In the boat, they worked just fine too. My only reservation has to do with the small diameter Kevlar laces, which, while they make tensioning the shoes a cinch, could theoretically snag on a rudder pedal or something during a wet exit.

I say theoretically because, try as I did, I couldn’t make such a thing happen. But you know how that goes—the car never makes that noise when your mechanic drives it.

Still, it’s a very small concern. If you worry about such things, leave the heel strap loose, and you can easily slide out of the shoes. I would also cut off the Velcro tabs at the ends of the laces and singe the ends to prevent them from fraying.

COLUMBIA Hell’s Canyon $70

The Hell’s Canyon shoes wouldn’t draw a second glance if you wore them shopping or to the health club—they look just like a generic athletic shoe. The upper doesn’t drain as quickly as the Salomon shoes (hold the latter sideways up to the light, and you can see right through them; not so the Columbias), but mesh and drains in the forefoot pump water out within a few yards of walking. Likewise, the sole of the Hell’s Canyon doesn’t have the same protection plate under the arch as the Salomon.

On the other hand, its ribbed carbon rubber sole sticks better to wet rock, and an EVA mid-sole cushions your stride on smooth surfaces. There’s a row of thick stitching around the perimeter of the sole, the function of which I’m unclear about since the sole is glued to the upper, but the stitching looks vulnerable to abrasion, so let’s hope it’s just for fashion. A bead of seam sealer would help protect it.

The Hell’s Canyon was among the most comfortable shoes in the boat, due in part to the supportive nylon and synthetic nubuck upper. That, combined with the sticky sole, seemed to give me a little more control over the rudder pedals than any of the other shoes.

They were also noticeably warmer than the Salomons, which I expected, considering their solid upper, and when paired with neoprene socks felt very warm indeed. Combined with their ability to serve as perfectly normal-feeling walking shoes, this made Columbia’s Hell’s Canyon one of my top choices as an all-around boating shoe. Just tuck in those lace ends—they have a lot of extra length to them.

FIVE TEN Splash $49

The Splash is an update of (and a significant improvement on) the already excellent Five Ten Hydraulic. Like its predecessor, the Splash is a high-topped, pull-on shoe, but its upper is made from 3mm neoprene instead of the Hydraulic’s 4mm.

Nevertheless, it’s still a warm shoe and a good choice for cold-weather wear. With a neoprene sock, it would be even warmer. That said, the Splash shoes never became clammy during my trial runs in mild conditions. And the bright red of the sample provided brought back fond memories of my old Keds.
The soles are a non-marking gray rubber with sort of an octopus sucker arrangement minus the sucker holes. Whatever the structure, the result is that they stick just like an octopus to wet rocks.

The forefoot is flexible enough to allow your feet to mold around rocks, but there’s noticeably more stiffness under the heel and arch than in the Hydraulic to help guard against sharp-edged rocks.

The best addition to the Splash is a whole bunch of vulcanized reinforcing rubber in high-wear spots, with a double thickness of it around the heel and toe box. These shoes should be immune to abrasion, whether from rough fiberglass inside the kayak or rough rocks outside of it. The perfectly cupped heel pocket will make long paddling days a numbness-free cinch.

The Five Tens wouldn’t be as suitable for long hikes as the Salomons or the Teva Rodiums (see following Teva reviews), but for messing about in boats, they’re unbeatable.

TEVA Proton $35

The Protons, which are available in both men’s and women’s sizes, are the climbing slippers of the water shoe world: a low-cut, slip-on wisp of a shoe for those who would really rather go barefoot but need a little protection and traction.

The crosshatched, thin rubber sole sticks well to wet or dry surfaces, although it offers scant impact protection or armoring against protruding rock edges. However, it does wrap just high enough on the upper to prevent chafe on your heel and the side of your foot in the boat.

I worry about the many lines of stitching joining the synthetic nubuck and nylon mesh in the upper, but I didn’t notice any incipient problems, such as chafe, during testing.

Since the Protons add very little bulk to your foot, they’d be ideal in tight quarters like a skinny, Greenland-style kayak. They’re great in hot weather, but if they were sized so a neoprene sock would fit inside, they would work in chilly conditions, too.

Rodium S.O. $69.95

Also from Teva, the Rodiums look more like water clogs than water shoes. They’re big and blocky and the heaviest in the review by a couple of ounces, despite a low-cut, slip-on upper. It’s all due to the sole, which is thick and stiff and makes the Rodiums the most comfortable walking shoe reviewed (except perhaps for the Salomons).

A shock pad in the heel and a synthetic shank across the arch isolate your feet from virtually any ground nastiness or from sharp rudder pedal edges. The sole itself is only lightly scored, thus its traction on wet and dry rock is excellent, but on sand-covered rock, it felt much less secure than a sole with deep lugs.

In the kayak, the Rodium’s thick heel cup made for notably comfortable long passages, and there were no protruding interior seams to annoy. After immersion, two grommets in the bottom of the synthetic leather and nylon upper drain the bilges dry within a few steps. For a low-cut shoe, these seemed very warm, but the knit nylon mesh took a long time to dry.

ADIDAS Water Moc $65

The stylish Water Mocs have the look of a track racing shoe, with red accents and a bright, coated stretch-fabric lace cover that snaps over two plastic hooks.

The cover is supposed to protect the laces from snagging, but it actually seems that it is itself something that can snag. In fact, one cover developed a small tear, suggesting that it might have snagged on something during testing.
Lacing aside, the Water Mocs performed well. The uppers are a blend of perforated synthetic leather and a very fine mesh that kept out everything except silty sand but drained in a second.

Three small, screened holes so far under the arch as to be in the sole, and several more under the heel, actively pump out any remaining water. Of course, with all the mesh and holes, the Water Mocs ventilate fabulously and are comfortable in hot weather.

If you buy them sized to give you a slightly loose fit, you can have room inside for neoprene socks in cold weather.

The sole is a thin rubber, but with fairly aggressive lugs, so traction was good on almost anything. An EVA mid-sole provides surprising cushioning for the thickness but not much resistance to gouging edges.

There’s a smidgen of arch support, so walking on smooth surfaces was comfortable for long distances. Although I think Adidas could remove the lace cover, and perhaps even replace the laces with a Velcro strap, the Water Moc is a good kayaking shoe.

Hydrology $65

You’ve heard the old joke about screen doors on a submarine?

It popped into my head when I examined the second Adidas water shoe reviewed, which sports a half-dozen comparatively huge metal screen ports right in the bottom of the sole.

Like screen doors on a submarine, they let water in or out with equal facility. I thought they would clog quickly in sand, but that never happened. Only when I took them on a fresh-water excursion to a lake with muddy banks did they plug tight—after pumping a bunch of silt inside.

But for most seashore substrates—sand, cobble or rock—they worked just fine, and made the Hydrology one of the quickest draining shoes I tried.

Otherwise, they look and perform very similarly to the Water Mocs, except that the lace cover is sewn all the way up one side of the shoe, so it can’t snag in that direction at least (a big improvement from the Water Mocs).

The rubber reinforcing on the outside of the sole is also a little thicker, and the perforated synthetic nubuck uppers protect whatever part of your foot they cover (which doesn’t extend above the ankle bone) from abrasion. In fact, especially in light of their reasonable price, these shoes are a very good choice.

NORTHWEST RIVER SUPPLIES (NRS) Kickers $31.95

A draw cord around the low ankle opening plus a fat Velcro instep strap means there’s no way the Kickers will come off unintentionally—nice if you play in surf or other situations where capsizes and thrashing wet exits are frequent. The flexible rubber sole wraps around the 2mm neoprene uppers at the heel, instep and toe to protect the foot and add abrasion resistance.

NRS built a thin plastic shim into the mid-sole of the Kickers, which helps a bit when hopping over jagged rocks, but there’s still very little protection in such circumstances. Best to keep the speed down and let the sticky soles cling where you put them. If you paddle along shores where slick rocks are the norm, consider the optional felt soles, which act like the soles on fly-fishing waders to grip right through slime.

The Kickers have a business-like appearance, as if fashion had been well below function on the design brief. And that’s just how they performed. I’d rate these as perfect for high-energy paddling, where a bit of warmth, protection and traction and a lot of security are important.

Normally somewhat of a marketing skeptic, I admit to being impressed at how well manufacturers have addressed the needs of boaters with these shoes. I was also pleased at the range of function and features, which should satisfy paddlers from Beringia to Baja. I know I’ll find a use for them—at least until I stumble across one of those gentle, white sand beaches.

DRY FEET, WARM HEART: Waterproof Socks
by Jonathan Hanson

An interesting alternative to the traditional means of keeping your feet warm while paddling—some sort of neoprene sock or bootie, which stays warm when wet—is to keep them dry and warm, by wearing waterproof socks. I tried out a couple of varieties with the water shoes from this review.

The first thing I learned was that only tall stretchy socks work for kayaking. I tried a pair of Gore-Tex oversock, designed for hikers to wear over regular socks.

They use a non-stretch nylon outer fabric with stretch panel in front and a Gore-Tex laminate inside, lined with tricot. The top was only about 10 inches high and kept my feet dry as long as the water stayed below the tops, which just have a loose-fitting hem—nothing to prevent water entry.

Once dunked, I was left with soaked feet and socks full of water that wouldn’t drain. Gore-Tex is permeable to water as a vapor, not as a liquid. These might work great under hiking boots for fording shallow streams, but they’re not for situations where a full dunking is not uncommon.

SEALSKINZ

The stretchy socks from Sealskinz, on the other hand, worked well even when fully immersed. Their WaterBlocker Socks (15″ high) and All-Season Socks (11″ high) are both very comfortable worn over bare feet because they incorporate a soft lining of wicking material under a waterproof, breathable membrane. The stretch construction of both SealSkinz socks provided a snug fit and prevented much water from getting into either model.

I tried each pair under all the paddling shoes I tested and never found them unpleasant or clammy in 70-75° weather and 65° water. The difference between the two is that the WaterBlocker socks have a cuff designed to keep out most water even when completely immersed.

And it worked: I waded around in knee-deep water for 15 minutes and got barely a drop or two inside the sock. One swimming session produced the same results. But here’s the key: Even when I deliberately pulled the cuff open and let them fill with water, it quickly warmed to body temperature, and I stayed as comfortable as I would have with a thin neoprene sock.

I was sold. However, because the WaterBlocker cuff was no less comfortable than the cuffs on the All-Season version, I’d give them my highest recommendation.

I still need to try them in hot weather, when they might be too stuffy. But for cool or cold conditions, worn alone in the former or under a standard neoprene bootie in the latter, I think these waterproof socks could be a valuable extra line of defense against immersion hypothermia and an excellent way to keep your feet more comfortable at other times.

Greenland-Style Tuiliqs

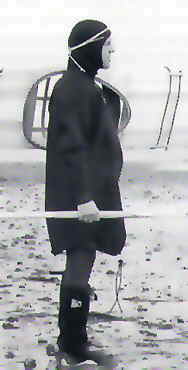
To seal themselves into the cockpits of their kayaks, the Native Greenland paddlers often use a tuiitsoq.

You’d recognize it as a sealskin version of a sprayskirt.

It cinches around the coaming and under the paddler’s armpits and is held up by a pair of shoulder straps. However, the tuiitsoq is “only meant for fair weather sailing in the spring and summer,” according to H.C. Petersen, author of Skinboats of Greenland.

When the weather turns cold and the seas rough, the Greenlanders don tuiliqs, paddling jackets that seal tightly around the face and wrists and attach directly to the cockpit coaming.

The tuiliq not only seals the kayaker into his kayak, it provides good protection from the cold, and unrestricted mobility for the broad range of Greenland bracing and rolling techniques. When I wear either my wetsuit or my dry suit and a neoprene hood, my neck is still exposed, and my neoprene hood may cover my ears-which are susceptible to injury by exposure to cold water, but it doesn’t protect them from water forced in by rolling.

The tuiliq has good protection for both of these areas, and eliminates the possibility of taking on water between a sprayskirt and a paddling jacket.

Brooks Wetsuits of British Columbia has been making neoprene tuiliqs for Greenland paddlers for about six years, but hasn’t marketed them here in North America. I didn’t know their tuiliq existed until I saw the one used by Greenland kayak champion Maligiaq Padilla.

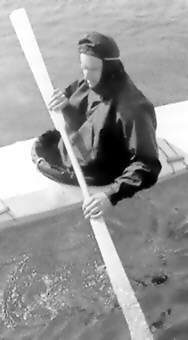
The seams of the Brooks tuiliq are glued on the inside and sewn on the outside. Its hem has a rubber-side-out sleeve around a bungie cord that seals the tuiliq to the cockpit coaming.

While the cut of the tuiliq is designed for small Greenland cockpits, the extra-large tuiliq I tested fit cockpits in sizes ranging from the 22″ by 15″ cockpit of my traditional Greenland kayak to the 31″ by 16″ cockpit coaming of a typical North American fiberglass kayak with an adequate amount of stretch.

The sleeves fit snugly at the wrists and forearms to seal out water, yet they are generously cut around the elbow and shoulder to allow an unrestricted range of motion for paddling. Velcro straps at the cuffs provide additional compression for the neoprene at the wrists.

The hood has a long drawstring that runs in the hem around the face opening. Drawn tight, the string seals the opening around your face and the extra length wraps around the crown of your head to hold the hood in place.

The Brooks tuiliq is very well suited for rolling. Its loose mid-section provides unlimited flexibility for torso rotation and lay backs. The hood protects the ears and the neck, which can lose body heat quickly.

Even while I was doing rolls that call for capsizing face-first into the water, no water got past the face seal to my ears. After 10 or 15 minutes of rolling, I got some seepage of water in through the cuffs and face opening; enough to wet my skin, but not enough to chill me or collect in the cockpit. Nylon webbing suspenders support the “skirt” of the tuiliq and keep water from pushing the tuiliq into the cockpit opening.

Even though a wet exit is not compatible with the Greenland style, I was curious to know if the loose fit of the neoprene around my torso would provide any warmth if I were in the water. After a wet exit, I was surprised at how much air the tuiliq kept in it when I came to the surface. The air buoyed up around my chest and shoulders and provided a lot of flotation. By tucking the skirt of the tuiliq in between my legs, it provided some thermal protection for my groin and kept water from circulating around my torso.

With my legs crossed and hands folded over my chest, I floated comfortably in the water. The seal around my face let only a little air out if I worked my jaw around but, for the most part, the fit was airtight and maintained the air bubble. I’d still recommend wearing a thermal protective layer under the tuiliq, but I was surprised by how much warmth and buoyancy it provided while I was in the water.

While the Brooks tuiliq is too warm for cruising in the heat of summer, I think it is a great piece of apparel for paddling in cold weather and rough water, and it is excellent for rolling practice.

Superior Kayaks offers a tuiliq in Gore-Tex. The Superior tuiliq, according to the manufacturer, was designed as touring apparel-more for comfort while paddling than for immersion wear.

It does not have suspenders to hold the front of the skirt up, so a bit of water-not enough to worry about-can pool in the front of the tuiliq where the fabric sags into the cockpit. For the coaming of a modern recreational kayak, the hem of the tuiliq is drawn tight around the cockpit coaming with a bungie cord. For a traditional coaming without a flange, the tuiliq is secured with nylon cord. The cuffs fold to fit around the wrist and are secured with Velcro straps, while the face opening is drawn tight with a cord with a sliding cord-lock.

There is a hand-warming pocket on the chest. The seams are double stitched, but the fabric edges are not hemmed. In the hood and shoulder areas they are sealed with silicone sealant: It is not as fancy as using heat-sealed seam tape, but it does keep water from seeping in.

The Gore-Tex fabric doesn’t create the same airtight seal as neoprene and, during rolls, some water did trickle in around my face where the cloth puckers around the drawstring and through the cuffs where the fabric is folded back on itself. Even with the seepage, my ears and neck were still well protected from the water.

For cruising, I’d wear the Superior tuiliq under my PFD, if for no other reason than to have access to the equipment that I keep in my PFD’s pockets. Since it is cut full enough to fit over a PFD, you could carry the tuiliq in a deck bag and, if the weather took a turn for the worse, pull it over your PFD, paddling jacket and sprayskirt.

The breathabililty of the Gore-Tex is an advantage over the neoprene tuiliq for keeping the paddler dry in soggy weather and a bit cooler in warmer weather.
Although the wrist and face seals and the seams of the Superior tuiliq aren’t state-of-the-art, it is an economical and functional paddling garment for cold-weather cruising, and should appeal especially to aficionados of Greenland-style kayaks and equipment.

Both Brooks and Superior make mittens for their tuiliqs. The Brooks neoprene mittens seal well over the tuiliq sleeves and have plenty of finger room. Superior’s Gore-Tex mittens have wide openings that make them easy to put on. They’re meant for protection from wind and spray, not immersion.

Neither the Brooks nor the Superior mittens have enough friction to get a good grip on a slick, synthetic paddle shaft, but on the oiled wood shaft of a Greenland paddle they work fine. The Superior mitten also comes in a double-thumb version that can be turned around.

This feature helped Greenlanders get a fresh grip when one side of a sealskin mitten became soggy and slippery. Gore-Tex won’t get as slippery with use, so the double thumb is a bit of a novelty and a nod to its Greenland ancestry.

Tuiliq Length: Function not Fashion In keeping with the Greenland style, both of these contem-porary tuiliqs hang to about knee level. The length makes it possible to do extreme lay backs for rolling and, according to H.C Petersen, to push out of the seat without breaking the seal at the cockpit coaming. In Skinboats of Greenland, he relates the experience of Peter Petrussen who, as a young kayaker, was embarrassed by the length of the tuiliq sewn for him by his mother: “It looked too much like a girl’s skirt.” The latest fashion (in the early 1900s) had been toward shorter tuiliqs.

Petrussen went paddling with it and capsized. He had not yet learned to roll, “but, thanks to the long suit, I could push myself out of the cockpit without dislodging the suit from the coaming. In this way I could turn enough to raise my head to the surface and breathe.” Petrussen called for help and was rescued.

I tried this with both tuiliqs, first in a hard-shell boat with a small bulkheaded cockpit, and then in a traditionally built skin-on-frame Greenland kayak. In both cases I couldn’t get very far out of my seat-maybe two or three inches-before the vacuum created as I pushed away from the kayak pressed the tuiliq so hard against me that I couldn’t move away far enough to twist to the surface.

In the Greenland kayak there was less of a vacuum-perhaps because of the flexibility of its skin or the absence of bulkheads that reduce the volume of the cockpit-but I still could not overcome the vacuum holding me in the cockpit.

Although I couldn’t figure out how to do the maneuver Petrussen described, both tuiliqs tested are long enough for me to lean back and touch my head on the aft deck. I wouldn’t want either of them to be any shorter.

Modern Materials – Ancient Designs. Carbon-fiber Greenland and Aleut paddles

It’s an odd thing to combine some of the oldest kayak paddle designs with the most modern materials. In the span of time that separates the use of driftwood to carbon fiber, there have been countless advancements in paddle design: feathered blades, asymmetrical blades, wing blades, bent shafts and adjustable length shafts. Paddle manufacturers all over the world have devoted a lot of effort to designing new and better paddles.

For a while, traditional paddles were only of interest to kayakers drawn to replicas of skin-on-frame kayaks. Hand-carved wooden paddles had their advocates and a growing number of kayakers beyond the skin-on-frame crowd began trying them and learning how to use them.

Greenland paddles, and to a lesser degree Aleut paddles, proved their worth to many cruising sea kayakers, and a few manufacturers have interpreted these time-honored designs in modern materials using carbon-fiber composite laminates and foam cores for greater strength and lighter weight.

Greenland Paddles

Wing paddles may be among the latest major development in paddle design, but the principle behind it, using lateral movement of the paddle blade through the water to generate lift, is an old idea. It’s what gives Greenland paddles great power in spite of their narrow width.

While a modern wing paddle develops lift by moving outward from the kayak, a Greenland paddle does so by slicing downward and using the opposite edge of its blade as the leading edge. That lateral movement also keeps the paddle moving into water that is as yet undisturbed and provides more resistance to slip. The Greenland paddle has an advantage over the modern wing paddle in its symmetrical design: It is equally effective moving either direction. The narrow Greenland blades also allow users to grip the paddle anywhere along its length for a variety of techniques.

While the blades are narrow, they are quite long and have an area the equivalent of many Euro blades. The long blade is like a glider wing; its high-aspect ratio is particularly efficient at generating lift. Euro paddles used for sculling braces function like planning watercraft. They provide a lot of support while skimming across the surface. Greenland blades generate more lift while submerged.

Greenland paddles are often referred to as “sticks,” but they are sophisticated in design and versatile in use.

Aleut Paddles

Aleut paddles haven’t achieved the same recognition as Greenland paddles, but they may yet become popular. While Greenland kayaking is perhaps best known for its variety of rolling techniques, the Aleuts had a reputation for traveling long distances at high speeds, so perhaps the interest in Aleut technology will grow among contemporary kayakers looking for an efficient means of covering a lot of sea miles.

Aleut paddles are symmetrical from edge to edge like Greenland paddles, but asymmetrical from face to face. One face is slightly arched and a ridge runs down the center of the opposite face. In some specimens the ridge had a narrow groove running the length of it. The blade is offset from the axis of the shaft. The blade face without the ridge is aligned with the edge of the shaft.

Though I’ve never seen evidence that would define which way the Aleut paddle is to be used, it is generally accepted that the ridged face is the power face. Wolfgang Brink, author of the construction manual The Aleut Kayakwrites, “The correct way to hold an Aleutian paddle is with the ridge on the face of the blade facing back.”

My own experience with Aleut paddles suggests Wolfgang is correct. With the ridged side of the blade as the power face, the blade is forward of the shaft. When you apply power, the blade settles more comfortably behind the shaft, much in the same way that the caster wheels on the front end of a grocery cart fall in behind the caster’s pivot axis. You can paddle with the blade in the opposite orientation, but it takes a tighter grip to keep the paddle stable. For me, the other significant aspect of using the ridge face as the power face is evident when flipping out of a forward stroke and into a low brace. That transition puts the smooth face down—it skims across the water with much less drag than the ridged side of the blade.

The offset blade is exceptionally stable and allows the paddler to keep a loose grip. Add to that the soft catch of a narrow-bladed paddle and the Aleut-style paddle has some attributes cruising kayakers might find very beneficial over the long haul.

Trials

To test the five paddles here, I took the three Greenland paddles out for trials with my skin-on-frame Southwest Greenland replica, and the two Aleut paddles with my Hearst (formerly Lowie) Museum baidarka replica. It was clearly evident that there were differences in the flexibility of the paddles, so I did quick-and-dirty objective measurements on my workbench at home.

With half of each paddle secured on the bench and the other half extending beyond the end of the bench, I measured the height of the cantilevered blade at rest and with a 10-pound weight set on the end of it. As a point of reference, I also measured the flex of wooden replica paddles I’d made. My 85-inch red-cedar Aleut paddle (weighing 29.2 ounces) flexed 2 3⁄4 inches. My 80-inch yellow cedar Greenland paddle (weighing 34.5 ounces) flexed 2 ¼ inches.

Superior Kayaks Greenland Paddle

I reviewed Superior’s earliest carbon-fiber Greenland paddle in the October 2001 issue of Sea Kayaker. The paddle reviewed at that time was a single piece. That version is still available but for this review, I took a look at the two-piece paddle. It uses the Lendal Paddlok to join the two halves. The button snaps in place to join the two halves and a hex key is used to tighten the joint by means of an internal expansion. That makes it less susceptible to wear and will take up any slack created by use over the years.

The two-piece 85-inch paddle weighed in at a mere 26.4 ounces. The blade has a maximum width of 3½-inches. The workmanship is exceptional. From end-to-end the carbon fiber weave has no irregularities. The 1¼ by 1½-inch shaft is oval, with short parallel sides, and is built around a cylindrical carbon-fiber ferrule. The seam left by the molds is trimmed flush, which is evident along the sides of the shaft but not on the edges of the blades.

The blades are foam core and shaped with uniform convex curves, with neither hollowing between the centerline to the edges nor a tighter radius defining a central ridge. The inboard ends of the blades have gently rounded shoulders to engage your pinkie and ring fingers. On some traditional Greenland paddles the blades taper smoothly from blade to shaft; I prefer the shoulders for giving the hands a more positive grip location and better control of the blade angle. With the slick finish of the Superior Greenland paddle, the shoulders also kept my hands from slipping.

The Superior paddle has a silky smooth feel in the water. It enters the water cleanly and is very stable through the Greenland stroke, even when accelerating at full power. The blades have tight radiused edges, but they’re not uncomfortable to grip for extended-paddle techniques.

The Superior paddle flexed 1 5⁄16-inches on the workbench. During paddling, rolling or bracing, I could detect only a slight flex while doing sharp braces with the extended paddle. With normal use, the flex is enough to cushion the sudden application of force.

Northern Lights Greenland Paddle

Northern Lights makes a three-piece Greenland paddle. The blades are built to a standard 36-inch length and the overall length of the paddle is determined by the center shaft, which is available in one-inch increments from 9-inches to 18-inches for overall lengths from 81-inches to 90-inches. The 84-inch version weighed 35.7 ounces. The blades are 3 3⁄4-inches wide at the tip. Each Northern Lights Greenland paddle comes with a storm-paddle center section that joins the two blades in a 72-inch overall length and with a 6-inch shaft, suitable for using with the Greenland sliding stroke where you alternate hands, pulling on the shaft and pushing on the upper blade.

Each joint is locked with a setscrew tightened by the Allen key provided with the paddle. There are no irregularities in the weave of the carbon-fiber fabric, and if there was a seam that needed trimming after the forming of the parts, I found no obvious trace of it; the finish is uniformly smooth over the entire paddle.

The curve of the grip carries into the blade faces as a gentle ridge and flattens gradually out to the end of the blade. There are very slight and narrow grooves paralleling the edges of the blades. The Northern Lights Greenland paddle was delivered in an innovative cover. Its looks like an 8-foot long tube sock because it was made at a sock factory—very clever.

The sample I initially tested developed a crack a couple of inches outboard of one blade’s shoulder. The paddle was still intact and quite solid feeling. I don’t know when the fracture occurred, but I’d guess it was while using the paddle extended from the aft deck while getting out of the kayak at the beach. The manufacturer had had no other reports of such a fracture. With the manufacturer’s permission I sawed the paddle open and discovered the internal reinforcement of the grip area had created a stress riser.

To see how much weight it might take to create a similar fracture on the other blade I set the end of the shaft and the end of the blade on blocks and pushed on the suspended joint with my hands. When I had nearly my full weight on the joint, about 190 to 200 pounds, I heard a faint snap and found a 1⁄8-inch crack in the finish on the bottom side.

The manufacturer eliminated the stress riser and made a few more improvements to the paddle and sent a new one. (Northern Lights guarantees its paddles so consumers would receive free replacements of fractured paddles. As we go to press, Northern Lights has not examined the fractured blade to see if the proper layup schedule is present in the damaged area.) I put the new paddle to the same test and it was undamaged.

Putting so much weight on a paddle shaft, especially on its joint, isn’t what I’d consider normal use, so I didn’t subject the other paddles here to the same test. Two Euro-style sectional paddles in our livery, one with a carbon shaft, the other with fiberglass—both with the ignoble distinction that I wouldn’t miss them if I broke them—survived my full weight on the shaft joint. The Northern Lights Greenland paddle meets that standard for strength.

The paddle’s finish is satin rather than glossy, so it’s not at all slippery in the hand. The shaft has flat sides and semicircular ends and offers a comfortable and positive grip.

The shoulders of the blades are shaped just as I like them and let me know where the blades are with my pinkie fingers wrapped around the inner ends of the blades.

In use, the Northern Lights Greenland paddle was light, but not a featherweight, and very solid feeling. On the workbench I measured a 1 3⁄16 -inch flex with the 10-pound weight.

I quickly found the angle at the catch that would get the blade immersed without dragging air in behind the blade. For sculling techniques the paddle was stable and predictable. The edges of the blades are about ¼-inch thick and are very comfortable in the hand during extended-paddle bracing and rolling. In general it had a very familiar feel to it.

Northern Lights Aleut-inspired Paddle

The Aleut-inspired paddle from Northern Lights makes a few manufacturer-acknowledged departures from the traditional form. The ridge on the power face is without the groove and does not run the length of the blade—the outboard half of the blade is nearly flat.

The power face is slightly convex rather than ridged and the back face is slightly convex, not more that 1⁄16-inch hollow. The Northern Lights website states that this concave side of the 3 ½ inchwide blade scan serves as an alternate power face, and the curved configuration has some of the lift-generating capabilities of a wing paddle.

Like the blades of a wing paddle, the blades of the Northern Lights paddle are set at an angle to the shaft. Set the paddle on a flat surface, ridged side up, and the blade’s tips rise up about 5⁄8 inch. This would help make the blade more stable when used with the convex side as the power face, but I felt it was still easier to manage the paddle in its standard orientation.

The construction of the Aleut-inspired paddle was quite similar to the Northern Lights Greenland paddle.

I didn’t detect any flex while using the paddle. It felt quite solid. On the workbench with the 10-pound weight its flex was identical to its Greenland counterpart: 1 3⁄16-inches. The 90-inch paddle (36-inch blades with 18-inch shaft) weighed 31.9 ounces.

Novorca Greenland Paddle

The Greenland paddle from Novorca is stunningly beautiful. Each foam-cored Novorca paddle is custom built and colored according to the buyer’s wishes. The paddle sent for review was a combination of red and orange.

The colors are wiped down to leave the lustrous black carbon fiber showing in places. Pigment fills some of the hollows in the weave to accentuate the pattern. The result looks like it was pulled out of a koi pond. The finish has a high gloss and there’s no trace of molding lines.

The company logo, the builder’s signature and date all lie on the shaft under the clear finish coat. The 84 ½-inch paddle has 3 ½-inch  wide blades and weighed a remarkably light 24.2 ounces. The flex test on the workbench deflected the blade 2-inches.

The shaft has an elliptical cross section without flats on the sides. The shouldered blades have a nearly diamond section with a slight convex curve between the edges and the central ridge.

On the water the Novorca Greenland was very light in the hands. The blade shoulders make a gentle transition from shaft to blade but have enough shape to provide a secure grip in spite of the mirror finish. The 1.2-inch x 1.4-inch shaft was smaller than what I’m used to, but didn’t compromise my grip or comfort. (Novorca offers a range of shaft sizes as well as a variety of shoulder shapes and blade-tip profiles.)

The blades took the water cleanly, and it was easy to paddle without pulling any air down with the blade. The paddle had a whippy feel to it. I could feel the paddle flex when I pulled hard, particularly when doing extended-paddle strokes and braces. It was unusual but not disconcerting. Sculling with the Novorca Greenland was also an interesting experience.

The blade seemed to snap through the change of direction at the ends of the sculling stroke, probably as the energy stored in the flexed paddle released at the change of direction. For rolling the blades provided good lift. Greenland rolls don’t rely on the application of a lot of force so I didn’t notice the flex unless I exaggerated the pull on the paddle.

The Novorca performed very well and it had a livelier feel than my wooden paddles. Like the colorful finish, the Novorca Greenland paddle’s performance added a new dimension to my Greenland experience.

Novorca Aleut Paddle

Novorca’s foam-cored, carbon-fiber Aleut paddle has many of the features that are associated with traditional Aleut paddles. The back side of the blade is offset and aligned with the shaft.

The power face has a long central ridge that extends nearly to the tip. Some Aleut paddles have a groove carved in the middle of the ridge, but Novorca has omitted this feature. I don’t know the purpose of the groove, so I don’t mind its absence in the updated form.

The craftsmanship on the Novorca Aleut paddle is extraordinary. The carbon weave is uniform throughout and the glossy finish is as shiny as new patent leather. The purple pigment has an iridescent and mesmerizing blue glow.

The grip has an egg-shaped section with a broader curve fitting into the grip of the fingers and a tighter curve on the power face side that tucks into the web of the thumb. It has a comfortable but quite different feel either way you hold the paddle.

The 91 ½-inch paddle weighs 26.4 ounces. It flexed 2 7⁄16-inches with the 10-pound weight resting on the cantilevered blade, but I didn’t feel it flexing in use. The blades are 3 ½-inch wide and have subtle shoulders at the juncture with the shaft which helped me keep a solid grip. I could get a clean entry with the paddle held ridge facing forward or aft, but I preferred the more stable feel of the paddle with the ridged side of the blade as the power face.

As I mentioned earlier, I also like the low brace better with the ridge upward and the smooth back face skimming on the water. Rolling, sculling and bracing were all positive with the Aleut paddle.

It was as much a pleasure to use as it is to look at.

Technique: How to use a Towline with a Kayak


A cow-tail can be clipped directly to the bow of a kayak that needs a quick tow to move to safety.

I like to get the most out of my kayaking gear; all pieces of my kayaking gear are under constant scrutiny.

Less is better, smaller is better, simple is better, and function is paramount. The one piece of gear that may have provided the greatest opportunity for scrutiny is my towline.

A towline is a fundamental piece of safety gear. You can use a towline to assist a tired or injured paddlers and keep them moving with the group. With a towline you can help a struggling paddler keep on course when strong winds or current make directional control difficult.

In many circumstances, a tow can prevent a more severe incident from occurring. In calm water most tow lines will work fairly well, but no one can guarantee calm water at all times. Used near surf, in breaking waves near rocks, or in strong current, towlines can still be useful but the risk of entanglement makes them particularly dangerous. It is often the case, though, that rough conditions make a tow an urgent necessity.

Using towlines in rough conditions is deceptively difficult and proper training and practice are necessary. Well-designed gear helps make using a towline easier and safer to use.

Complex design

A towline needs to meet several demanding and sometimes contradictory requirements. It must be unobtrusive but be close at hand, enclosed but easy to open. In use, it has to attach easily and come off easily, but remain secure under difficult conditions.

It should be of simple design but adaptable to various modes of use. It should be strong yet just a little elastic, it must be quick to deploy in a short tether and in a long towline. It must release reliably when the user is capsized and the line is under tension. It must be usable with cold wet hands and with gloves on.

We will need a few pieces of good gear to make a proper towing system that meet all these demands without getting complicated, awkward or bulky. I start with a standard whitewater quick-release rescue belt and cow-tail available at most whitewater paddling gear outlets. This simple unobtrusive setup is excellent for short-tows over a short distance. To tow an unstable or distressed kayaker, a push-tow (also called a toggle-tow or a rafted-tow) can be used.

The cow tail is a piece of nylon tubing with a shock cord threaded through it. It has a carabiner on one end and a ring for a quick-release belt on the other.

Coming alongside the distressed kayaker, quickly clip the cow-tail onto the forward deck lines or bow carry toggle. With the cow-tail attached to the bow, and the kayaks in a bow-to-stern orientation, you can push the victim’s boat. Paddling forward causes the kayaks to move together and the victim can take comfort, leaning on the rescue kayak for stability.

This push-tow is very effective-maneuvering and making good forward speed is surprisingly easy. If the kayak you are pushing has a rudder or skeg it should be retracted in most cases. If you are having difficulty keeping a steady course in wind or waves, dropping your skeg or rudder is likely to help.

For longer towing chores, a floating tow line is clipped into the cow-tail to provide more separation between the kayaks.

To retrieve a loose kayak or to provide a quick tow to a stable paddler, you can clip the cow-tail onto deck lines or the bow toggle and proceed with both kayaks facing the same direction. The bow of the boat you are towing in this manner will be just aft of you and is not likely to interfere with paddling.

In turbulent water, the bow of the kayak you are trying to get a towline on may be bouncing up and down a couple of feet or more, so you have to be careful not to get hit in the face or speared in the ribs. While busy paying attention to your own stability and safety, you must be sure of clipping into the tow in a proper manner.

To clip into a kayak on your right side, the cow-tail must lead from your back and directly away to the right. To clip into a kayak on your left, the cow-tail must lead from your back and away to the left. A common error is to inadvertently cross the cow-tail across your stomach. If the line crosses your stomach the towing tension will be off-center, the cow-tail will have a very short working length and the quick-release will be compromised.

This is an easy error to commit, but an easy one to avoid. When working on your off side, pass the cow-tail behind your back before clipping into a kayak.

As with any safety and rescue gear or techniques, plenty of practice in rough but controlled conditions is essential.

If your PFD does not have belt loops already built in, you can sew some on or incorporate loops between the PFD’s side cinches. (Permanently altering a PFD may revoke the Coast Guard approval.)

The belt loops will stop the belt from rotating around your body and keep the buckle in place, easy to find, and quick to release. Incorporated with the PFD, the belt and cow-tail are always with you, never forgotten, and always close at hand. When integrated into the design of the PFD, the strain on the tow-belt is spread out across the lower part of your chest.

An independent tow-belt that rests around your waist below your PFD doesn’t take advantage of the padding and comfort your PFD can provide. The safety and reliability of a rescue belt with a cow-tail has been proven through a long history of demanding use for whitewater rescue.

Making a towline: Tie a loop in one end using an overhead knot. When the cow-tail is clipped into the towline, a lark’s-head knot keeps the loop in place and prevents it from coming free if part of the loop gets pulled againest th egate of the carabiner.

The other end of a towline is tied to a marine-grade carabiner using an anchor hitch. A seized version of the hitch is shown here.

Alternate uses.

During rescues or other occasions when you need both hands free, the cow-tail is a convenient paddle-park for one or more paddles. Run the carabiner once completely around the paddles and then clip it onto the cow-tail to make a loop that will cinch tight around the paddle shafts.

While doing a paddle-float reentry on a windy day, it can be awkward to hold onto the kayak and paddle and inflate a paddle float at the same time. The cow-tail can be clipped onto perimeter deck-lines to keep you and your kayak together.

When the weather is rough, you will need a longer towline to prevent kayaks from colliding into one another. This is particularly important when towing in following seas where the kayak being towedcan ride a wave and collide with or overtake the lead kayak.

A longer towline is also more practical when towing for more than just a few minutes: the lead kayak has its full maneuverability and it won’t bump and wear against the kayak it is towing. For a long towline I use 25 feet of 1/4″ diameter floating braided line.

Tie a loop in one end and tie a marine-grade carabiner on the other end. Clip the carabiner into the loop on the opposite end and stuff the line into a small belt bag or deck bag; leave a small piece of the loop sticking out. If you are stowing the line in a bag attached to your towing belt, make sure the bag is attached to the buckle end of the belt. This will assure that the bag will not interfere with the D-ring which will slip easily off the other end of the belt.

There are one-piece towlines that are sewn or tied directly to the belt without the advantage of the easy separation of the D-ring from the belt. (It is preferable to use a belt held in belt loops.

When strung through belt-loops the tongue of the belt will run free, releasing the D-ring and leaving the belt and bag attached to the PFD. If the whole belt and bag is released, it may foul up and catch on rudders, spare paddles and other gear on the back deck.

Some PFDs have towing -belt loops already sewn in place (right). If your PFD does not have belt loops you can sew a pice of nylon webbing into a loop and add two lines of stitching to create two openings (left).

The openings are large enough to slip over th ecinch-strap buckles at the side of most PFDs and center opening holds the towing belt (center).

To deploy a long towline, pull the loop of the line out of its bag; you will have both ends of the towline in hand. Clip the cow-tail carabiner to the loop; you are now ready to go.

Before proceeding into a rough water rescue, you can also pull all the line out of the bag, and stuff it under deck bungies or just stuff it under your PFD. Once again, deploy the towline properly to the right or left above; avoid crossing the towline in front of your body.

Unclip the towline carabiner from the loop and clip it to the bow toggle or forward deck line of the kayak you intend to tow.

Keep your back deck as uncluttered as possible, as long towlines will snag under the edges of a spare paddle, on rudders, or other gear on the back deck. The farther back the line becomes snagged the more difficult it will be for you to execute the tow: If the line is snagged well aft it will prevent you from turning. The towline must pivot from the center of your kayak for you to retain your kayak’s maneuverability.

A cow-tail is a useful and reliable piece of safety and rescue equipment that can be incorporated with a long towline to make a safe and multipurpose towing system. Well designed and properly deployed, a towline is a great help keeping hampered kayakers out of harm’s way or rescuing a victim from a dangerous situation.

Kestrel Anemometer (Wind Speed Measurement Device)

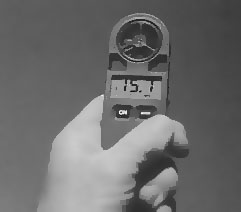
The unit arrived without instructions; nevertheless, it took only a couple of minutes to figure out the sequence in pushing the two buttons to access current wind speed, maximum and average speeds, and to switch the display between miles per hour, kilometers per hour, meters per second, feet per minute and knots.

The Kestrel anemometer reads wind speeds up to 78 knots, a limit that, while somewhat lower than other anemometers, should be academic for any kayakers who aren’t trying out for a BCU instructor’s certificate.

Although not as compact as the tiny, lithium-powered Skywatch meter , the Kestrel offers many more functions, and has a replaceable battery. The lithium cell of the Skywatch is said to be good for thousands of readings; however, once it dies, the unit is trash. The Kestrel is fully waterproof, and floats as well; the slide-off outer case protects the impeller and display screen. Of course, I keep it in a waterproof pouch anyway.

While I like anemometers and use them often when I have one, I have a difficult time thinking of them as a necessary item of kayaking gear. I can’t imagine a situation in which I’d base a decision whether or not to paddle solely on the meter reading: if conditions looked too rough to go out but my anemometer said the wind was only blowing 20 knots, would I change my mind and launch anyway?

Heck no. However, it’s interesting to compare your gut-level feelings with a real number, and it’s fun to test your instinctual anemometer against the solid-state version—I pass well on lower wind speeds, but tend to exaggerate a bit past 40 knots. On a practical basis, you could use the averaging feature to confirm a sense that the breeze was increasing or decreasing over time.

The other situation when a wind meter might come in handy is if you’re with a group of gung-ho companions who are trying to goad you into launching when you feel like lounging on the beach. I found that, with hyperventilation and an all-out effort, I could blow through the Kestrel hard enough to register a 28-knot reading on the “maximum” function.

You could show this to your friends and attempt to convince them that conditions are just too marginal for safety—best to make another pot of coffee and get out the Thermaloungers. Be careful with this strategy, however— when I tried it on my wife, she asked why my face was so red.

A review of two DSC/GPS VHF Handhelds

Handheld VHF radios are essential pieces of safety gear for sea kayakers. A technology called Digital Selective Calling (DSC) is making handhelds even more indispensible for coordinating groups of paddlers and during emergencies.

The VHFs that sea kayakers have been using are analog transmitters/receivers for voice communications. Those radios now equipped with DSC have an additional digital transmitter/receiver for sending and receiving limited amounts of data such as GPS coordinates. With a DSC-enabled radio, you can press a distress button and a digital help message with your current GPS coordinates is sent to the Coast Guard (and other nearby vessels equipped with DSC radios). Here’s the lowdown on these “rescue me” radios.

Getting a Handle on DSC

DSC has been around for a while and is a popular option in the fixed-mount marine radios used in larger vessels. Within the past several years, DSC has finally started to show up in portable radios—thanks mostly to inexpensive GPS chips.

The Uniden Mystic was the first DSC/GPS handheld and was available circa 2004 at a cost of about $700. It was discontinued because of the high price, some reliability issues and because the Coast Guard’s DSC-based rescue network wasn’t available in a lot of places.

The technology for DSC has improved in recent years, and the cost of the components required has made handheld DSC-equipped radios more reliable and affordable. The two radios reviewed here are the most recent entries on the market and more manufacturers should be jumping on the bandwagon soon.

The United States Coast Guard has created a system called Rescue 21 that’s compatible with DSC radios. The system began being implemented in 2003 and currently covers almost all of the continental U.S. Coast and the Hudson and Columbia Rivers.

Each DSC radio has a unique identification number called an MMSI (Maritime Mobile Service Identity). When a DSC distress message is sent, the MMSI is transmitted to the Coast Guard along with the transmitting radio’s coordinates.

The Coast Guard uses the MMSI to retrieve information about the boat, its owner and emergency contacts from its database of registered MMSI numbers. This allows search and rescue responders to know instantly who’s in trouble and what type of boat to look for. The additional information provided to the database by the radio owner can speed up a rescue.

Registering an MMSI Number

DSC radios don’t come preprogrammed with MMSI numbers; you have to register to get one. The numbers are free and are available online at: www.boatus.com/mmsi/. You fill out a form and when you’re finished you’ll be assigned a nine-digit MMSI number to enter into your DSC radio. The information you provide on the form is added to the Coast Guard’s search-and-rescue database.

If you plan on using your DSC radio on different boats, say your kayak and sailboat, don’t associate an MMSI number with a specific vessel. Instead, in the online form’s Vessel Registration field (which accepts anything you type), enter “Handheld” and in the Remarks field, type “Handheld radio used on multiple vessels.”

Since the remarks can be edited after you get a MMSI number and are immediately updated in the Coast Guard’s database, you can specify which boat you’ll be using before any particular trip.

The BoatUS site is only for United States recreational boaters. If you live outside the U.S., check with your country’s Coast Guard or equivalent to see if DSC is available where you paddle and how to get an MMSI number. Canadians can download a form to register for a free number.

If you’re a U.S. citizen and plan on paddling internationally, it’s a good idea to get an MMSI number issued by the Federal Communications Commission (FCC) instead of BoatUS. U.S. regulations require that a VHF radio to be used in foreign ports have an operator permit.

A cautionary note: When you program a new handheld with your assigned MMSI number, be sure to enter it correctly.

Because of government regulations, once an MMSI is entered in a radio it can’t be changed. If you make a mistake or buy a used radio you’ll have to send it back to the factory so it can be reset.

Using DSC Radios

A DSC radio works just like a standard VHF handheld with a couple of exceptions. In an emergency, open a red plastic tab on the side of the radio (make sure the radio is on). This reveals a red button. Press and hold the button for 3 seconds.

If you have time, you can select the type of emergency from an on-screen list of options. The screen will confirm that the help message with your coordinates has been sent, then automatically switch the radio to Channel 16, where rescuers will try to contact you by voice.

Keep in mind that DSC radios aren’t just for emergencies. They’re also very useful for group paddling trips. MMSI numbers from other DSC radios can be entered and stored in your radio’s address book. Select a name from the address book of someone you want to call; each name has a corresponding MMSI number.

His or her radio will start ringing with an alert tone and automatically switch to the same channel as your radio. You can start chatting. If you and other members of your group are monitoring Channel 16, you don’t have to first hail one another on 16 and then switch to another channel.

You can also request the position coordinates of any radio listed in the address book. The other radio will reply with its latitude and longitude, and its distance and bearing will appear on your screen. The radio can serve as a GPS and set a course to the other DSC-equipped unit.

(DSC doesn’t provide continuous tracking, so if the other radio is moving, you’ll need to make multiple position requests to get the current coordinates. The LHR-80 reviewed here has a mode that will automatically query every 15, 30 or 60 minutes.)

Hands-on with the Standard Horizon HX851 and Lowrance LHR-80

Currently, there are only two handheld DSC radios with built-in GPS on the market; the Standard Horizon HX851 and Lowrance LHR-80. These radios have all the features you’d expect with a handheld VHF radio. They are submersible and include weather channels (plus an alert option for NOAA weather warnings), adjustable volume and squelch controls, channel scan and a Channel 9/16 priority button.

Both are full-size radios; however, thanks to rechargeable lithium batteries, they’re fairly light. The HX851 tipped my scale at 12 ounces while the LHR-80 weighed in at 11.1 ounces. That’s not bad, considering my compact Icom M-88 radio weighs 9.7 ounces.

Like any good marine handheld, both radios are JIS-7/IPX7 rated; they can withstand an immersion in 1 meter of water for 30 minutes. As a bonus they both float. I dunked the radios in a bucket of water for 30 minutes, pulled them out, dried them off and checked for function and leaks.

Both worked normally. The LHR-80 had a small amount of water between the battery and the radio. The battery fits snugly against the radio case, but because there’s no gasket there, a little water got in. The sealed internal electronics are protected, and the battery connection points have small gaskets so some water in the battery compartment isn’t cause for concern. I’d still clean the inside surfaces after exposure to salt water to clean out any salt left after the water evaporates. (Check out the February 2009 SK issue for reviews of other floating and submersible radios.)

Most handheld VHF radios, including the LHR-80, transmit either at low (1 watt) or high (5 watts). The HX851 offers transmission power settings of 1, 2.5, 5 and 6 watts. When you’re sitting low in the water with a small antenna, the more watts the better. And speaking of antennas, I really liked the soft, flexible antenna on the HX851. It’s friendlier than most hard, rigid antennas; especially if you wear a radio mounted high on your PFD.

Both radios come with a built-in, 12-channel GPS chip. Latitude and longitude are displayed and, just as you can with a basic GPS, you can enter and navigate to waypoints—up to 200 with the HX851 and 500 in the LHR-80. Getting a lock on a satellite upon startup was quite fast with both models. Keep in mind that DSC portables only offer rudimentary GPS features; don’t expect color charts, routes, or turn-by-turn driving directions. A DSC radio is not a replacement for your handheld GPS.

One of the main differences between the two radios is the screen. The LHR-80 has a bigger screen compared to the HX851, with larger and bolder text that makes it easier to read. But readability on the HX851 is improved with the backlight turned on. In terms of usability, I preferred the buttons on the HX851. They’re slightly larger, have a better tactile feel, and a more logical layout compared to the LHR-80. Both radios have a number of settings, controlled by on-screen text menus.

Expect roughly seven hours of battery life with the HX851 and eight-plus hours for the LHR-80. The LHR-80 has a higher capacity battery (1400 mAh) compared to the HX851 (1150 mAh). An optional tray for powering the HX851 with 5 AAA batteries is available; essential for extended trips when there are no electrical outlets for recharging. The radios have power-saving settings which can extend use at the expense of turning off the GPS chip.

On the water, both radios had good audio quality while transmitting and receiving. When hailed by another DSC-equipped radio, both the LHR-80 and the HX851 emitted a loud ringing tone guaranteed to get your attention even in the noisiest conditions.

The HX851 has two unique features. A bright LED light is mounted in the radio’s face that can serve as a flashlight or strobe light. If the radio is turned on and is immersed in water, the light will automatically start blinking. Additionally, there’s a glow-in-the-dark band that surrounds the case making the radio easy to find in the dark.

Internet prices for the HX851 generally run between $225 and $270. The LHR-80 is priced from $175 to $200. While both of these radios are more expensive than basic VHF handhelds, the enhanced safety and convenience features of DSC and GPS make either of them well worth considering if you’re thinking about a new radio.

Five New Deck Bags

Another paddler – a complete stranger, in fact – once described me as “bristling” with safety gear. While I thought that was a bit much (“festooned,” maybe, but hardly “bristling”), I certainly do consider myself to be safety-conscious – which is partly why I’ve always been a strong proponent of deck bags.

Although I always keep several meteor flares, a strobe, a mirror, and knife on my PFD, I also insist on having my two-way radio, a few extra meteor flares, sometimes a parachute flare and even, depending on circumstances, an EPIRB, within easy reach.

A deck bag functions as a single, secure repository for this stuff, along with things of much more frequent but less pressing need, such as snacks and water.

For years I used a simple and inexpensive nylon deck bag that kept my gear together and readily accessible, but did nothing to keep water out. Anything inside that could be damaged by moisture was in a ziplock bag or waterproof case.

This worked okay, but it was awfully fussy at times. If I wanted, say, the bird guide to which I refer frequently, I had to open the deck bag, fish out the ziplock containing the book and open that, and stuff the ziplock back in the bag so it wouldn’t blow away, by which time the black-browed albatross I swore I’d spotted was long gone.

In addition, while the deck bag didn’t do much to keep water out, it seemed remarkably efficient at keeping it in. One dumping wave early in the morning was sufficient to keep the contents of the bag damp all day.

Photography was also a pain. Since I use 35mm SLR equipment, dry storage is essential-but so is fast access. One morning on the Sea of Cortez, I had just spotted several whales coming my way, running with the brisk tidal flow that surges past the midriff islands.

My camera was in a roll-top dry bag bungied on top of the deck bag, along with a wide-angle zoom and a short telephoto. The longer lens I figured I’d need was in a small case behind me. I parked my paddle and pulled both bag and case on top of the spray skirt while the sound of spouting drew nearer and nearer. I opened the waterproof case, opened the dry bag, juggled lenses, and that’s when a big fin whale rolled out of the water and blew, headed straight toward me not 30 feet away.

Gee, I guess I didn’t need that long lens after all.

All I could do was hang on to my $2,000 worth of exposed equipment while the boat rocked in the whale’s wake and a fine mist smelling of chum settled over me. There had to be a better way.

The solution to all this seemed obvious. When I got home I called around the country, but no one had anything like what I described, nor did anyone seem too keen on making something to my order.

That was several years before the first completely waterproof deck bags became widely available. Now, at last, the idea seems to have caught on. There are several completely waterproof models around, and a number of what you might call “sort-of” waterproof versions-water-resistant bags utilizing zippers that will keep out most water short of a dumping wave or a dunking.

I’ve been using a waterproof deck bag now for five years, with totally satisfactory results-which is to say, I haven’t drowned a camera yet. My bird book is right there when I need it, along with a bunch of other things freed from their baggies.

I feel better having my waterproof binoculars and VHF radio away from constant salt-water exposure.

Un-soggy granola bars are just a bonus.

However, make sure you have your priorities straight before buying one of these bags and chucking vulnerable electronics inside. I am constantly aware that there is just one layer of protection between the ocean and my camera’s 6-volt innards.

If it’s raining or the sea is rough, I not only can’t get my camera out, I can’t open the deck bag to get anything else in it. If you want to use a waterproof deck bag in all conditions, think of it as a secondary layer of security: Anything likely to get damaged by water gets ziplocked first and then put inside.

A deck bag leads a much harder life than the dry bags you carry in the cargo holds. It is constantly exposed to splashing, and often to strong dumping waves. The sun beats down on it, leading to ultraviolet deterioration, and it is subject to abrasion from paddles and botched landings.

So the choice of materials and the quality of construction are of vital importance if you expect to maintain watertight integrity. So is maintenance: I carefully inspect my deck bag before every use by holding it up to the light and looking for leaks, and I make sure the zipper is well-lubricated and free of debris.

I tested the five bags reviewed here first in normal, boat-mounted usage. Afterwards I lined them up and subjected each to a thorough dousing with a hose, trying in particular to squirt water past the zipper.

Then I completely dunked each one in a tub and held it there for 30 seconds-a longer immersion than one would expect from a capsize and roll.

Watershed’s Aleutian

The quality of Watershed’s products never fails to impress me, and the Aleutian continues the tradition that began with the company’s bombproof duffels and dry bags.

The Aleutian is made from an extremely strong polyurethane-coated nylon fabric, with seams that are radio-frequency welded rather than glued. Polyurethane has a couple of advantages over the less expensive and more common PVC (polyvinyl chloride) or simpler urethane coatings.

Watershed says polyurethane has four times the abrasion resistance of PVC, a claim I have no reason to doubt after abusing both materials. Just as importantly, the polyurethane coating, which is embossed with a fabric-like pattern on the outside of the Watershed bags, creates a very slick finish, unlike the slicker-looking but grabbier PVC.

If you poke a PVC-coated bag at an angle with the point of a knife (simulating any number of sharp objects that might accidentally poke it in real life), it tends to dig in, whereas on the polyurethane it’s more likely to skid off, decreasing the chances of a puncture.

Polyurethane is supposed to remain more flexible in cold weather, although the Sea of Cortez, even in January, was no place for me to confirm this. Finally, polyurethane application is a more environmentally benign process than PVC. (The same holds true for welding seams instead of gluing them.)

Watershed’s closure system resembles an oversized ziplock closure, with fat rubber lips you squeeze together, and two tabs that you pull apart to open it. It’s much easier to operate than a dry suit-type zipper, yet appears to be, for all the intents and purposes of a deck bag, just as waterproof.

No matter how hard or at what angle I squirted it, the contents remained dry. Same with the dunk test and while paddling. However, you must make absolutely certain that the lips are sealed along their entire length, or leakage is inevitable.

Watershed lists the volume of the Aleutian as four gallons-an amusing choice of measurement for something that’s supposed to be waterproof-or 989 cubic inches.

That’s a useful size; however, the Aleutian is built in a flat, envelope configuration, and there are no stiffeners to hold it open, so access is not the best. Also, my sample was a deep black color, so the interior was very dark (and hot), making it difficult to see the contents. I’d suggest buying a lighter color.

The bag has a clear chart window on top, underneath which is a pocket where a chart can be inserted; the chart is inside the bag so it always stays dry and in place.

The window is made from tough and highly UV-resistant urethane rather than PVC; nevertheless, it’s surely not as puncture-resistant as the main body and must be considered the weak point. If this were changed to a separate chart case on top of the bag, overall integrity would improve and you could remove the case to get a better look at the chart. [Editor’s note: After the bag was returned by the reviewer, we found that the flap that supports the chart hangs down into the bag. The flap tore easily when pushing gear into the bag.]

A mesh water bottle pocket is on the left exterior; on the right is a very secure holder for a standard cylindrical bilge pump. Finally, the front of the bag is bound with reflective tape that shows up well at night.

Mounting the Watershed bag revealed some deficiencies in the design. First, it’s a wide bag, so its mounting straps could barely be shortened enough to fit on the deck of a 22-inch-wide kayak. More importantly, with the straps pulled tight, it’s impossible to open the bag wide enough to put anything three-dimensional inside.

You have to leave the straps very loose to insert a camera. If the straps were welded to the bag somewhat underneath instead of right at the sides (or if the bag were built with an arched top panel), this problem would disappear. Also, the included strap hooks appear to be designed to clip over the deck bungies, a poor choice of attachment in my opinion. I would replace the hooks with narrower versions that would clip to the deck eyelets, or just tie short nylon cord loops through the eyelets and clip to those.

The Watershed Aleutian has a lot of thoughtful features. It could use a tweak to the mounting system or shape, and perhaps a removable stiffener to ease access.

Price: $110

Voyageur’s Half Dome

The Half Dome incorporates a polyethylene sheet stiffener that gives it a rounded profile-and makes accessing the contents a cinch. The bag is made from PVC-coated polyester in a simple, tapered shape, with no external pockets, save a mesh one at the rear big enough for sunscreen or a small water bottle. The bungies running across the top will secure (not very well) a chart in a ziplock.

The Half Dome utilizes a serious dry suit-type zipper closure that arcs over the rear end of the bag. When it’s open you can pull the rear flap down and easily see and retrieve everything inside the 900-cubic-inch bag. As I expected, there was no leakage under any circumstances. As with all examples of this type of zipper, however, it is quite stiff to operate. This is somewhat reassuring, since you know when the thing is closed, unlike on, say, the Watershed where you have to feel all along the edge of the lips to make sure you’ve popped every bit shut. But the zipper requires a strong pull, which would be much easier if Voyageur added loops at either end of the opening to hook a thumb through while pulling with the other hand.

The Half Dome has the best wave-shedding profile of the bunch. Although its tapered front more easily scoops up small waves coming along the deck than the bags with bluff fronts, which block them, those waves and even bigger ones usually cascade harmlessly off the back of the Voyageur bag. When bigger waves hit the front of the blunt bags, they tended to splash up in my chest and face more.

The Half Dome’s compact shape and 14-inch width fit well on the deck of nearly any kayak. The mounting kit comprises four web straps with plastic clips on one end (like the Watershed, apparently designed to clip to bungies), and sewn loops on the other. If you slid these loops over the bungies that are laced across the bag, you would have an easily adjustable but pretty elastic bungie-to-bungie mount. However, try as I might I couldn’t disassemble the dang fitting that connects the ends of the bungie on the bag, so I couldn’t slide the loops on, short of cutting the bungie and retying it. If this were my bag, I’d ignore the whole setup, and use nylon cord and clips to tie the bag down by its four stout corner eyelets. I think this would be much sturdier in any case. Even with the corners pulled tight, the arched top makes it easy to insert and retrieve gear.

Overall, there was very little to criticize about the Voyageur bag. I worry a bit about the polyethylene sheet abrading the bag from the inside. I’d like to see reinforcing patches where the corners of the sheet rub. I’d wrap the edges of the sheet with tape or foam, but that’s quibbling. The Half Dome is simple, easy to use, and totally waterproof, at a very reasonable price.
Price: $90 | Voyageur

Cascade Designs’ Aleutian

The Aleutian employs a YKK zipper that appears to be one step down from the heavy duty dry suit integrity of the Half Dome’s version. It’s not as stiff to operate, but could still use a couple of grab loops on the bag to hold on to. It passed all my tests with no leakage whatsoever.

The Aleutian is made from urethane-coated Cordura nylon, with welded seams. The bag is stiffened with a polyethylene sheet into a flattened ovoid shape that uses all of its modest 620 cubic inches efficiently. The zipper arcs over the top of the bag about three inches from the rear, so the back doesn’t fold down like a flap-you have to just push down on it to access the inside. Still, it works fine, and there’s a fabric flap that covers the zipper to help keep out grit. The bag is tall enough to hold my SLR camera (if I leave off the motor drive), and wide enough for a couple of extra lenses, plus a field guide and snacks-in other words, it has all the room you’re likely to need. Yet at only 12 1/2 inches wide (compared to 20 for the Watershed, including the clips), it’s compact enough to fit any deck.

The mounting system of the Aleutian consists of two fat Velcro strips across the bottom, which you slide under your deck bungies. It’s not very stable this way; however, when I tied non-elastic nylon cord in an X between my deck fittings and fastened the strip under those, the bag didn’t move around as much. It has the advantage of adapting easily to various deck layouts, but I still wish the bag had D-rings at the corners so you could make your own more rigid attachment system.The Aleutian has no frills aside from bungies and a pair of clips on top to secure your chart case or small items.

In short, the Cascade Designs Aleutian is a versatile and efficiently sized deck bag that will fit a wide variety of boats, including narrow Greenland styles.
Price: $120 | Cascade Designs

Seattle Sports’ Sea Kayak Deck Bag

The Seattle Sports bag is a monster at 1200 cubic inches, yet at 15 inches in overall width it will still fit on most decks. This bag held all my normal deck bag stuff, plus a one-liter water 
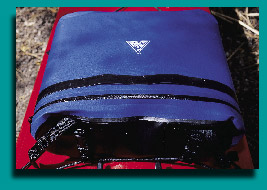
bottle, and still had room for my Gore-Tex shell when the morning turned warm. A stiffening sheet maintains the bag’s shape (and, as with most of these bags, is removable if you don’t want it).
I did not, however, put unprotected cameras inside. The Seattle Sports bag uses a YKK “Hydro-Kiss” weatherproof zipper which will fend off minor splashes and light rain, but is not waterproof. There was about a tablespoon of water inside after both hosing and dunking-although, to be fair, after a paddle in bouncy conditions the inside was quite dry. Still, this product is not intended to be waterproof. The fabric on the bag is a strong, urethane-coated, 400-denier nylon with welded seams, so no water is likely to get in that way.

This bag’s attachment system was the simplest and most adaptable. Nylon straps near each corner can be looped around bungies or through deck eyelets, or be substituted with your own hardware.

Given its large size but low profile, and versatile mounting system, the Seattle Sports bag would also be useful as a behind-the-cockpit bag for items such as outerwear, hats, and gloves, which you’d like to keep mostly dry but which won’t be harmed by a little water.
Price: $60 | Seattle Sports

Salamander’s Sea Kayak Deck Bag

With a zipper similar to that used on the Seattle Sports bag, the Salamander bag was similarly water resistant. PVC-coated nylon keeps the body of the bag waterproof, so only direct splashing or steady rain (or, of course, immersion) results in water inside. As with the 
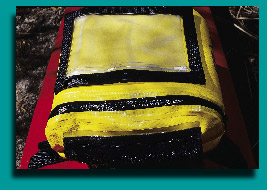
Seattle Sports model, the inside of the Salamander bag stayed dry during what I’d call a fair-weather paddle-light breezes and small waves. I could have had a field guide inside with no worries. But when subjected to direct spraying or dunking the zipper leaked a small amount of water almost immediately, mostly through the small gap visible at the end of the zipper track.

For its extra $25, the Salamander bag adds some nice touches compared to the unadorned Seattle Sports model: There’s a zippered mesh pouch on the back and an excellent chart case on top, secured with turn buttons. It’s a matter of a second or two to remove the case to get a better look at your chart.

A (non-removable) polyethylene sheet holds the shape of the deck bag, and the zipper is near the back so the opening flaps down out of your way. Salamander didn’t have a figure for volume, but by my own rough measurements it appears to be similar in size to the Voyageur bag-around 900 cubic inches. Overall width is 13 inches, so fit shouldn’t be a problem on most boats.

Mounting the Salamander bag is straightforward, using four nylon straps that radiate from a reinforced patch on the bottom; they should adapt to almost any kayak deck arrangement.

On my own 22″-wide boat I was able to loop the straps through short lengths of cord tied through my deck eyelets, and the result was very rigid, although waves do get under the bag and flop it around somewhat. This bottom mounting system can’t constrict access to the contents like the Watershed mount. There was a lot to like about the Salamander, as long as you keep its design limits in mind when you load it.
Price: $84.50 | Salamander Paddle Gear

The idea of semi-waterproof deck bag models initially seemed strange to me, but they do eliminate the dampness common with cheaper deck bags. While I’ll probably continue to put my faith in that single layer between the sea and a short circuit, there’s no doubt that even the semi-waterproof models add significant protection to any bagged item inside.

Waterproof Digital Photography

2001 was a pivotal year for on-the-water digital cameras (digicams). Little cameras were cautiously popping out of dry bags, and paddlers rafted up to view the results on tiny liquid crystal display (LCD) screens on the backs of the cameras. Digital images produced by these hi-tech wonders could be e-mailed to friends and family or even sent from expeditions via satellite phone to be loaded daily onto Web sites. Digital does away with film and developing expenses-just transfer the files to your computer, and you’re ready to go again. With in-camera editing, movie modes, “stitched” panoramas, reasonable prices, and new compact waterproof cases-digital has come to kayaking.

For 2002, prices are dropping, and the number of features are rising. The cost of memory, a big bugaboo just last year, has dropped through the floor. 128-MB memory cards sell for under $60 and have the capacity to store a dozen to hundreds of images, depending on image dimensions.

Waterproof cases for select digital cameras from Canon, Sony and Olympus first hit the market in 2000. Underwater housings for digicams have been available before, but they’ve been much bulkier and more expensive than the new compact cases. They hold the cameras securely, are lightweight, and take up only a little more space than a 35mm point-and-shoot. This year’s models are depth-rated to 100 ft or more, great for snorkeling, diving-or kayaking. External, O-ring sealed buttons control most or all of the camera functions.

Digital Primer

When you are shopping for digital cameras you need to understand how they work in order to choose the one that best suits your needs. The following is a list of features that you need to consider.

• Megapixels and resolution: The light-sensitive sensors that make up the CCD (charge-coupled device) in the camera are referred to as pixels. More pixels means higher resolution for bigger and sharper images. Digicams usually list the dimensions of the images they record in pixels: the Canon S30’s 2048×1536 image has 3,145,728 or roughly 3.2 Megapixels. If all you want is to send e-mail pictures, 640×480 is fine. Good 8×10 prints, require a 3 or 4 Megapixel digicam.

• Focal lengths of digital cameras differ from film. The CCD area is smaller than 35mm film, so a 7-21mm zoom may be equivalent to 35205mm in 35mm. Digicams usually list 35mm equivalents.

• Optical zooms use moving lens elements. 2x or 3x optical zooms are typical. I like 3x, in the 35205 range, for nice wide-angle to short-telephoto coverage.

• Digital zoom extends the range of optical zoom only by cropping and consequently reduces resolution. It’s useful only if you want low-resolution images for things like e-mail. Optical Zoom is the real deal.

• LCD and viewfinders: LCD screens consume valuable battery power and are tough to see in bright light. You’ll use the optical viewfinder to save power and frame pictures in bright light. That said, try to get a bright LCD. You’ll use it on the water to check framing and exposure. A waterproof case may partially block the viewfinder especially at the wide angle end of the zoom.

• Batteries: Many digicams require proprietary lithium-ion batteries. They are compact and have excellent storage capacity-twice that of NiCd’s- but with the LCD screen on and some in-camera editing, a few hours is all you’ll get before the battery runs down. This is fine for day trips, and possibly overnights, but for extended paddles you’ll want a few spares (at about $50 apiece). Recharge from an AC outlet takes 1 to 2 hours. Some digicams take AA batteries.

Digicams eat power too quickly for regular use of alkaline AAs, so it’s best to use rechargeables. NIMH (Nickel-Metal Halide) have 40% more capacity than NiCad’s (Nickel-Cadmium) and can be recharged without being fully discharged. And you’ll be charging a lot. A NIMH charger and a dozen batteries will handle weekend-long excursions. For expeditions, solar chargers available commercially for NIMH batteries would tip the scales toward AA’s.

• Image storage format: JPEG, a compressed format designed for photographic images, is the most common. Compressed images take less storage space, but at the expense of image quality. If you want top-quality images, digicams with TIFF compression will retain the highest image quality.

• Memory: The removable memory cards differ: Canon uses CompactFlash; Olympus uses SmartMedia; Sony has a proprietary Memory Stick. You can process your images with your computer and printer or take your memory card to a digital mini-lab or kiosk to make low-cost prints.

• Variable ISO: The light sensitivity of the CCD is listed in equivalencies of ISO ratings for film and can be changed to suit the image. You’ll have the flexibility to capture action in low light at ISO 400, and, moments later, a tripod-mounted, color-saturated sunset at ISO 50.

• USB (Universal Serial Bus) port: Most new digicams come with a cable to connect to the computer USB port for downloading images. If your computer was manufactured in 1998 or later, it almost surely has USB.

• Video port: Some cameras have a video port so you can view the pictures on your TV or transfer images to a video tape.

• Web publication: If you want images for e-mail or Web use, any low-end digicam will surpass your need. E-mail and Web images are best kept small. A 480×640 pixel, low-quality JPEG is usually as big as you’ll need and will download quickly.

• Print publication: Most magazines, including Sea Kayaker, print photographs at 300 dpi (dots per inch). This means the top-quality 2048×1536 image from the 3.2 Megapixel Canon S30 (reviewed below) will print no larger than 5″ x 7″, or half a page. Newspapers print at 150 dpi, so a 3.2 pixel image will work for 10″ x 14″. For home printing, 200 dpi generally makes very satisfactory prints.

• White balance: Many digicams allow you to adjust color balance, a great feature when indoors. For kayakers, it’s a plus in the pool, or while snorkeling, or while ashore in shade.

• Waterproof case: Finally, the reason to consider on-the-water digital in the first place: the availability of compact waterproof housings that allow camera operation by way of external buttons. This years cases are rated for submersion to 100 feet or more, and made from ABS plastic that should take some abuse. The cases aren’t pocket-sized, as the cameras are, but the extra bulk makes the camera easier to handle. The extension of the case around the zoom lens is likely to partly block the viewfinder. In addition, some of the camera functions may not be accessible via the buttons.

CANON POWERSHOT S30

Canon’s 3.2 Megapixel Powershot S30 and WP-DC300 waterproof case represent the best of what waterproof digital photography has to offer. (The 4.0 Megapixel S40 fits the same case.) The S30 has a range of automatic and manual controls that surpasses most film SLR’s. Canon’s A1, A2, S110 and S300 also have housings available, and are more like point-and-shoots in capabilities.

The S30’s brushed aluminum casing feels solid. The lens is protected by a cover that slides to reveal the lens and turn the camera on. The LCD is large (1.8″ diagonal) for the size of the camera.

The camera comes with a 16 MB CompactFlash memory card, Lithium-ion battery and charger, USB cable, Video cable, wrist strap, and Canon and ArcSoft software for the Mac or PC. It’s Windows XP compatible, and allows direct printing to the Canon CP20 Card Photo and S8210 Bubble Jet printers. The manual is easy to understand, with a good index. Other features are three-point autofocus, and an array of 13 exposure modes for automatic to complete manual control. Exposure sensitivity can be varied from 50 ISO to an amazing 800. The flash has all the right control options: auto, on, off, and auto or on red-eye reduction.

The camera’s shooting mode dial has icons that are intuitive, like a portrait icon for portrait mode or a mountain for scenic mode. Some you’ll need the manual to explain, like the palette-shaped icon that allows you to change your color intensity or black-and-white or sepia. There is also a movie mode and panorama stitch-assist mode. In replay mode you can view histograms (light profiles) and add voice messages for each image.

The shutter speed covers a wide range from 1/1500 to 15 seconds, and you can shoot in manual aperture- or shutter-priority modes. Apertures go from f/2.8 to f/8.0, a small range compared to a 35mm SLR, but in digital, f/8 gives excellent depth of field at the wide angle end of the zoom.

If you frame the image and completely press the shutter button, there will be a delay of about 1/2 second before the camera records the image. As with most digicams you can eliminate the lag by pushing the button halfway to prefocus. Then when you fully press the button, image capture is instantaneous.

The high-speed mode snaps 3 frames per second until the buffer fills up. You can hold down the shutter and reel off frame after frame of medium-sized JPEG’s, or 5 large-size, fine-quality JPEG’s. In low-light conditions the shutter rate may be slower.

Images are saved in three sizes of JPEG-2048×1536, 1024×768 or 640×480- or as a RAW file. The JPEGs can be saved at three levels of compression, giving you lots of storage options. Canon claims the RAW compression is “lossless,” that is, no information from the CCD is lost, yet file size is 1/2 the size of TIFF files. The RAW files I shot averaged 2.4 MB, and the 16 MB card has room for five. When converted to TIFF on my computer for use with photo manipulation software like Adobe Photoshop or the Canon’s ArcSoft Camera suite, they ballooned to 9 MB.

You can switch from picture-taking to replay with a flip of a switch. Images can be reviewed in the LCD singly or nine smaller images at a time. The 6x magnifier and scrolling functions allow you to check the image sharpness.

The movie feature got me hooked. The camera allows recordings of up to 30 seconds (320×240) or 2 minutes (160×120), complete with sound from the built-in microphone. The movies are saved as AVI files. You can play back the movies on the LCD and erase and reshoot if you don’t like what you got. A speaker in the camera allows you to hear playback sound as well. Even in the small file size the movies provide enough detail to critique paddle strokes. You can edit these down to show highlights for a practical-sized e-mail, or string them together for longer movie viewing on your computer. At 15 frame per second, the movies aren’t jerky. Even in the poor lighting of an indoor pool, they can readily capture an underwater roll sequence. Played back and blown-up on the computer the movies may not be video quality, but they are useful and fun.

With Stitch-Assist you can make panoramas. The LCD screen a shows half of the previous picture, so you can line up the next one. The stitching performed pretty well when I put the images together in the software program. RAW format is unavailable in this mode.

The Software

The camera has a street price of $599 and comes with a USB port and cable, and two CD’s with image organizing/editing software The software loaded into a Macintosh iBook and a PC with Windows 2000 without a hitch. In 10 minutes we were viewing pictures and, with the supplied Quicktime Player 5.0, watching movies. We loaded the software into a PC with Windows 98 but were unable to retrieve any images or video after 30 minutes of trying. With the Canon software you can organize files, crop images for e-mail, and merge photos in Photostitch. The ArcSoft software includes PhotoImpressions and VideoImpressions for image and movie editing.

The 8″x10″ picture I printed from a 2048×1536 image fine-quality, JPEG file, was very good, matching what I could do on my printer with film and a good-quality film scanner.

THE WP-DC300 WATERPROOF CASE

The WP-DC300 case is clear ABS plastic with bright yellow and green buttons and a blue latch.

The buttons allow control of all the camera functions except on off. Before you put the camera in the housing, you need to slide the clamshell cover from over the lens, which turns on the camera. The camera then fits snugly into the case, and the clasp closure puts a reassuring bit of pressure on the seal. Unfortunately, there is no way to turn the camera on and off once the camera is inside the case. To save power, I turned off the LCD display with one of the case buttons, and used the viewfinder for picture taking on-the-water. Canon recommends opening the case only in a place “of low humidity well away from salty sea air.” It might be a good idea to tape a (very) small desiccant packet inside the case. With the LCD on only intermittently, a fully-charged battery lasted for a day trip. By evening the low-battery warning flashed when I turned on the LCD. It’s too bad this top-of-the-line, waterproof-case-compatible digital has this limitation. Canon’s other cameras and Sony’s DSC P1, P3 and P5can be powered on and off by a button in their waterproof cases.

The case is about the size of a 35mm SLR film camera with a small lens and has enough buoyancy to float the camera. Its thickness makes it awkward to wedge inside your PFD and it’s too big for a PFD pocket, so a deck bag or day hatch would be good stowage options.

On a sunny day, I found the LCD hard to see, even with the display brightened. It’s easy enough to frame a picture, but not to see details. In overcast light this isn’t too much of a problem. I found I didn’t like relying on the optical viewfinder exclusively, though, even though it saves energy. The view is small and about a third of the wide angle view is blocked by the lens extension. Whether I used the LCD or the viewfinder, I found I wanted to check the replay to be sure I got the shot.

The housing really shined at the pool. The LCD screen was easy to see underwater. Recording little movies of roll practice was a snap. Toggle to replay-and hey-there’s my paddle digging too deep on an offside roll.

The case, with a $179 to $199 street price, comes with anti-fog liquid for the front glass and silicone grease for the door seal. The manual is full of warnings about handling that “may cause leaks.” Don’t expect Canon to warranty the camera if you screw up and trash the camera.

The waterproof case, aside from the camera’s lack of an on off button, is superb. The combination of the new compact submersible housings and new versatile digicams offer lots of possibilities especially for day trips, or weekends where battery life is not an issue. If you’re a point-and-shoot photographer, you’ll find the Canon S30 easy to use, but probably more camera than you’ll need. If you’re a dedicated SLR shooter looking for picture-taking control in a small package, the Canon S30 camera is probably the smallest camera in its class that gives you so many features. You won’t find any complications, and will be thrilled at the possibilities.

Saddling Up – New Accessories for Kayak Racks

When we all ascend to the Valhalla of sea kayakers, we will find ourselves in a land of endless fjords, with seafront homes on protected coves scattered about for the choosing. There will be no cars (well, perhaps a few Porsche Carerras, for those who so wish), and no need ever to expose our boats to the brutalities of a road system.

I have a few lucky friends who live this way right here in their mortal lives, except for the Porsches. But for the rest of us, particularly those, like me, who reside in states where “tide” refers only to laundry detergent, launching a sea kayak invariably involves an intermediary trip in a car or truck.

Road time is the most dangerous time in the life of a kayak. I personally know of more boats damaged or destroyed while being transported than were harmed by surf landings or collisions with various forms of marine substrate.

Despite such statistics, I’m sometimes astonished at those who will blithely drop the better part of three grand on a Kevlar kayak, then quibble over less than ten percent of that to transport it safely. Your kayak deserves the best rack and saddles you can afford.

If you really blew your entire budget on the boat and those 20-ounce paddles, it’s possible, with a bit of work, to make your own racks and saddles—but that’s another story. For now, we’re concerned with the latest developments in commercial saddle systems.

For several years, while leading sea kayak trips to remote areas in Mexico, I regularly carried six to eight boats at a time for hundreds of miles on interstates, rough pavement, dirt roads and tortuous four-wheel-drive tracks. I learned a lot about what it takes to transport a kayak not only safely, but with little danger of even cosmetic damage.

First, you don’t need a lot of padding. It’s tempting to try to provide the cushiest ride possible for your boat, but overly soft foam creates more problems than it solves, because it will continue to compress after you snug everything down and hit the road. The result is loose straps and chafing as the boat moves around. A boat that is locked down on a well-fitting cradle needs only a bare minimum of padding to absorb vibrations and shock.

Second, plastic is great stuff. I was highly suspicious of the first composite rack systems; aluminum and oak were my preferred materials. But countless horrifying incidents involving boats secured on commercial racks and encounters with gale-force crosswinds, Land Cruiser-sized potholes and world-class washboard roads have convinced me of the astounding safety factor built into fiber-reinforced nylon and similar materials.

Durability doesn’t seem to suffer either—some of my first plastic saddles have years and years of use on them, with little sign of fatigue. The one thing I’m still cautious of is UV exposure. As far as I know, the plastic hasn’t yet been developed that is immune to degradation from sunlight. So eschew the poseur thing and take off your racks between trips.

Other than that, I’ve pretty much stopped sighing when a maker substitutes plastic for a previously metal part, and look forward to seeing what can be done in the future. Here’s a sampling of what’s being done right now.