
Fiberglass kayaks are much tougher than most people think they are. A solidly built glass boat is perfectly capable of landings on rocky shores and will hold up for years with some simple maintenance. However, any kayak will eventually start to show signs of wear.
Most boats wear along the keel line, particularly at the ends. Whitewater canoeists are used to applying skid plates to these areas of their boats. Many kayakers in Great Britain, where rough landings on rocky shores are common, apply a bow-to-stern keel strip to their kayaks.
A keel strip is also a great way to repair a composite kayak that has been abraded at the stems and is a good preventive measure if you’re planning a long expedition in exposed conditions.
A keel strip is essentially a piece of fiberglass or polyester tape saturated with resin and covered with thickened gel coat. The process of applying a keel strip involves masking and prepping the hull, laying on the fiberglass tape and finishing over the tape with gel coat.
The whole project can easily be completed in an afternoon if you have the materials assembled and a warm place to work.
Preparing the Hull
The first step is to make sure the hull of the boat is clean and free of contaminants. I usually give the hull a wipe with denatured alcohol before masking.
Acetone will also work but is much more toxic to handle. As with any fiberglass project, make sure to take proper precautions to protect yourself from vapors and contact with chemicals. Work in a well-ventilated area, and wear gloves and a respirator.
We’ll be working with polyester resin because of its quick cure time and forgiving nature. Unfortunately, not all kayaks are compatible with this material.
If your kayak is made of epoxy, you won’t be able to apply a keel strip using these directions. Luckily, almost all commercially manufactured kayaks are made with polyester or vinylester resin. If your kayak was made with a different material, such as epoxy, it’s likely that the manufacturer has noted that in its advertisements.
Check with the manufacturer before starting this project if you suspect that your kayak is made of another material.
Masking Strip
Once you’ve cleaned the hull, run a piece of two-inch-wide masking tape down the center of the keel line from bow to stern. This will be your guide for masking the rest of the job, so make it straight.
Trim the ends of the tape off square or to a point, depending on your aesthetic preferences. The best tape to use for this job is the blue masking tape made by 3M. This tape is easy to remove and won’t leave a residue of adhesive on the gel coat. It’s more expensive but well worth the extra money.
The next step is to run a strip of one-inch-wide masking tape down either side of the central piece of tape. This layer of tape should be just under a quarter-inch outside your two-inch guide strip.
Finish the ends the same way you finished the original piece. Once you have the one-inch tape firmly rubbed to the hull, remove the center tape and discard it. You should now have an area approximately two inches wide masked off down the center of the kayak.
Next, abrade the gel coat outlined by the tape. Roughing the surface will assure that the polyester resin will adhere properly. This is most easily done by using a flap brush with an electric drill.
The type that works best for this project has nylon bristles arranged in rows around a drum: It won’t remove the masking tape from the hull when you start sanding. Brushes with more tightly arranged bristles will. Getting the proper flap brush will save you a lot of masking headaches. Wear a dust mask, safety glasses and hearing protection while using the sanding bit.
Work the brush all the way down the center of the masked area, overlapping the tape to ensure that the entire surface has been prepped. Give the prepped surface a quick wipe with acetone to remove the dust from sanding. Now you’re ready to finish masking.
The next strip of one-inch tape is applied overlapping the outer strips and covering only 1/8-inch of the sanded gel coat. Run the tape all the way down the hull on both sides so that you have two pieces of tape forming the border of the keel-strip area. If you have a skeg in the boat, run two pieces of tape over the skeg box, overlapping each other at the center.
Trim these pieces to shape with a razor knife, just outside the perimeter of the skeg box opening. Two pieces of tape are then used to separate the skeg box area from the rest of the masked strip. The fiberglass tape won’t actually cover the skeg box area, but the gel coat will.
Once you have finished this final masking, give the boat another wipe with acetone. Now you’re ready to apply the fiberglass.
Applying Fiberglass and Resin
Mix up a batch of waxed polyester resin according to the directions provided on the container. I prefer to use 10 to 20 percent more catalyst than is recommended. This creates a “hotter” mix that will cure more quickly. You will be working the fiberglass tape into shape as it cures, so it’s nice to have a mix that goes off fairly quickly.
As the resin gets tacky, you can use a cheap bristle brush to get the tape pressed neatly to the hull. Polyester resin is fairly tolerant of imprecise ratios, and I’ve had good success with this technique.
Waxed polyester resin is used because the wax in the mix will rise to the resin’s surface as it cures. This isolates the resin from oxygen and promotes a quick, hard cure. Unwaxed resin would remain sticky for far too long when used in this application. Make up a big batch of resin—10 ounces should do it. You don’t want to run out halfway through the process.
Roll out a piece of two-inch fiberglass tape onto the hull of the boat and cut it to size. If you have a skeg in the boat, you will need two pieces: one to run from the front of the skeg box area to the bow and a second to run from the rear of the skeg box area to the stern.
The tape will lengthen somewhat as you brush it into place, but you will be trimming it later after the resin has been applied.
Using an inexpensive bristle brush, apply a layer of resin to the hull between the masked lines. Roll out the fiberglass tape starting at one end and moving to the other.
Apply resin to the tape once you have laid it into position. Again, start at one end and work toward the other. Try to keep the tape straight, and work the resin into the fibers so that it becomes a uniform, translucent color.
As you reach the turn of the bow or stern, the tape will resist lying down smoothly. This is where you need to continue working until the resin begins to cure. As it starts to cure, it will get sticky, and the fiberglass will lie down and adhere to the gel coat.
You will be pulling the top layer of masking tape off the kayak before the resin becomes too hard. You want the resin to be slightly thick, like the consistency of molasses, when you do this.
Pull the masking tape across the center of the boat as you remove it. This pulls any residue from the resin back onto the resin-saturated fiberglass tape and creates a neat line. Remove the two cross pieces of masking tape in the skeg box area at this time.
As the resin becomes “green” or partially cured, use a razor knife to trim the fiberglass tape into the desired shape at the ends. Repeat the process with the other end of the kayak if necessary.
While all of this has been going on, you will have been mixing up the gel coat concoction. Mix about two parts clear gel coat with one part waxed polyester resin. To this add microballoons to thicken the mixture to the consistency of thick pancake batter.
You will want about 16 ounces of thickened gel before you start. Use pigment to darken the gel coat to the desired color. Black, red and yellow are commonly available pigments. Light gray might be the most practical color to mix, as most kayak hulls are white.
The microballoons will lighten the color of the dried gel coat, so it’s important to add a lot of pigment to get the right effect. White is, obviously, the easiest color to work with in this respect.
However, it’s nice to have the keel strip a different color from the rest of the hull so you can tell when it’s wearing thin. You can always start with a ready-made colored gel coat, but you will get a very light result unless you add pigment to the mix. Once you have the desired thickness, add the appropriate amount of catalyst to your gel coat.
The thickened gel coat needs to be applied to the keel strip before the resin has fully cured. The best time to do it is immediately after you have removed the first layer of masking tape and trimmed the ends of the fiberglass.
Use a two-inch-wide paint brush with soft bristles for this part of the job. If you have the gel coat at the right consistency, it will flow onto the weave in a thick layer, leaving few brush marks. If it’s too thin, you’ll have a shiny layer of gel with weave showing through. Too thick and it won’t flow properly off the brush. Again, thick pancake batter is what you’re looking for.
You can test the consistency before adding hardener by painting over a piece of scrap fiberglass that has been taped to wax paper. The gel coat mixture should fill in the weave and shouldn’t run down the paper if you set it on edge.
You won’t have to wait too long before removing the second set of masks. Your thickened gel coat should not run down the hull once you remove the tape. As before, pull the masking tape across the center of the boat to allow the partition line to roll back onto the gel coat.
Use a razor knife to pull up the edge of the top piece of masking tape covering the skeg box. Remove this strip, pulling toward the gel-coat area. Repeat with the second piece of masking tape.
Don’t wait too long to begin removing the tape. You want the gel to drip back into the center of the strip and be absorbed into the rest of the finish. Wait too long, and you won’t be able to pull the tape off—the gel coat will already have hardened.
I usually check by sticking my gloved finger into some of the curing gel on the masking tape. You just want to be sure that it won’t run. It sounds difficult, but it really isn’t. You will have had a chance to practice on the clear resin before you tackle the cosmetic gel coat. No matter what you do, the result will have the requisite strength. Good timing just makes for a more professional-looking result.
It’s worth mentioning that some of the materials commonly used in the U.K. for keel strips are hard to come by in the States. Diolene tape and waxed styrene in particular are tough to find.
Neither is essential for this project, but some people prefer Diolene over fiberglass because of its toughness. Diolene is a trade name of a special kind of treated polyester cloth used to increase impact-resistance in layups. This material is harder to work with than fiberglass, but it will last longer before wearing through.
Note also that Diolene tape has a width of 60 mm, a bit wider than two-inch fiberglass tape. If you find it, you will have to mask your center stripe to 60 mm before beginning to prep.
Waxed styrene is often used to add wax to the gel coat layer. Adding waxed resin to the mix will do the job pretty well, but if you have waxed styrene, it helps to add a couple of tablespoons. You probably won’t be able to buy pre-waxed styrene, but you can make it at home. To make “styrene wax,” simply mix paraffin canning wax with styrene.
Use a razor knife to shave tiny feathers of wax into the liquid. Keep adding wax until it stops dissolving. Mix the concoction a little bit at a time, or make a big batch and save it in a glass jar. You can buy canning wax at most grocery stores, and you can order styrene through a marine supply house.
Congratulations—you have just finished your first keel strip!
This piece of fiberglass will make your kayak much tougher and will provide a sacrificial layer to take abrasions that would otherwise damage the hull. It may be necessary to refinish the keel strip from time to time as it wears.
Simply re-mask the edge, rough up the surface with the nylon flap wheel, and apply a new layer of thickened gel coat.
Adding a keel strip is a great way to beef up an aging kayak or prepare a new boat for an ambitious trip. Don’t be afraid to tackle this project at home—the results are well worth the effort.
Brian Day is a BCU Level-3 sea-kayak coach. He has been paddling sea kayaks since 1992 and whitewater since 1994. Depending on the season, you’ll find him either running whitewater, paddling canoes in the Boundary Waters of Minnesota, or kayaking on the sea. He is currently living and working in Ely, Minnesota.
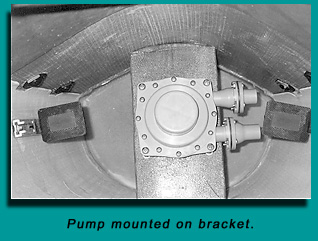
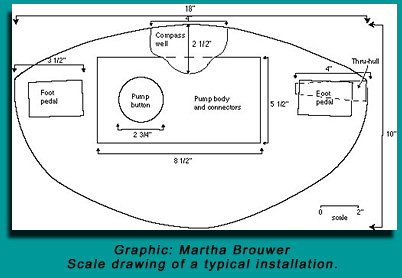 Since I frequently paddle by myself, I decided to install a foot pump. After some research, I settled on the Guzzler 450-S, manufactured by The Bosworth Company. It was much less expensive and somewhat more available than other foot pump models I could find.
 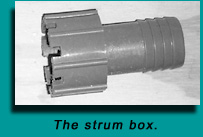 The strum box serves two purposes: It smoothes the flow of water into the intake hose and strains out any large debris. To make your strum box, use a hack saw to notch the rim of a 11/2″ end of PVC coupling. The notches should be about 1/4″ wide by 1/4″ deep and evenly spaced. (I used a table saw to cut my notches. I set the blade height to 1/4″ and set the rip fence to 3/4″. You can also use a round or a rat-tail file to make the notches.)
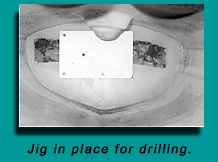
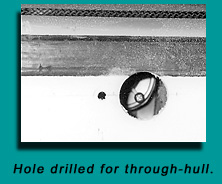
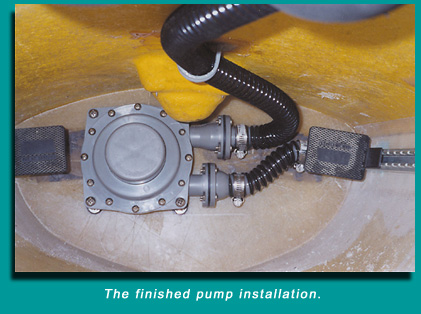
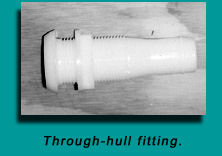 Cut the hose to the lengths you estimate are needed to go to your through-hull (discharge hose) and strum box (intake hose). Err on the generous side—cut them long and trim as necessary. Since you might have to route the intake hose around the inside of the cockpit to get from a strum box (located behind the seat) to the pump, there’s really no straightforward way of determining the length beforehand.)
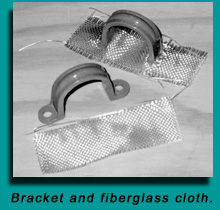 You’ll need to work through the front hatch to fasten the pump to the bulkhead.